Thursday, March 31, 2011

Page 21-19


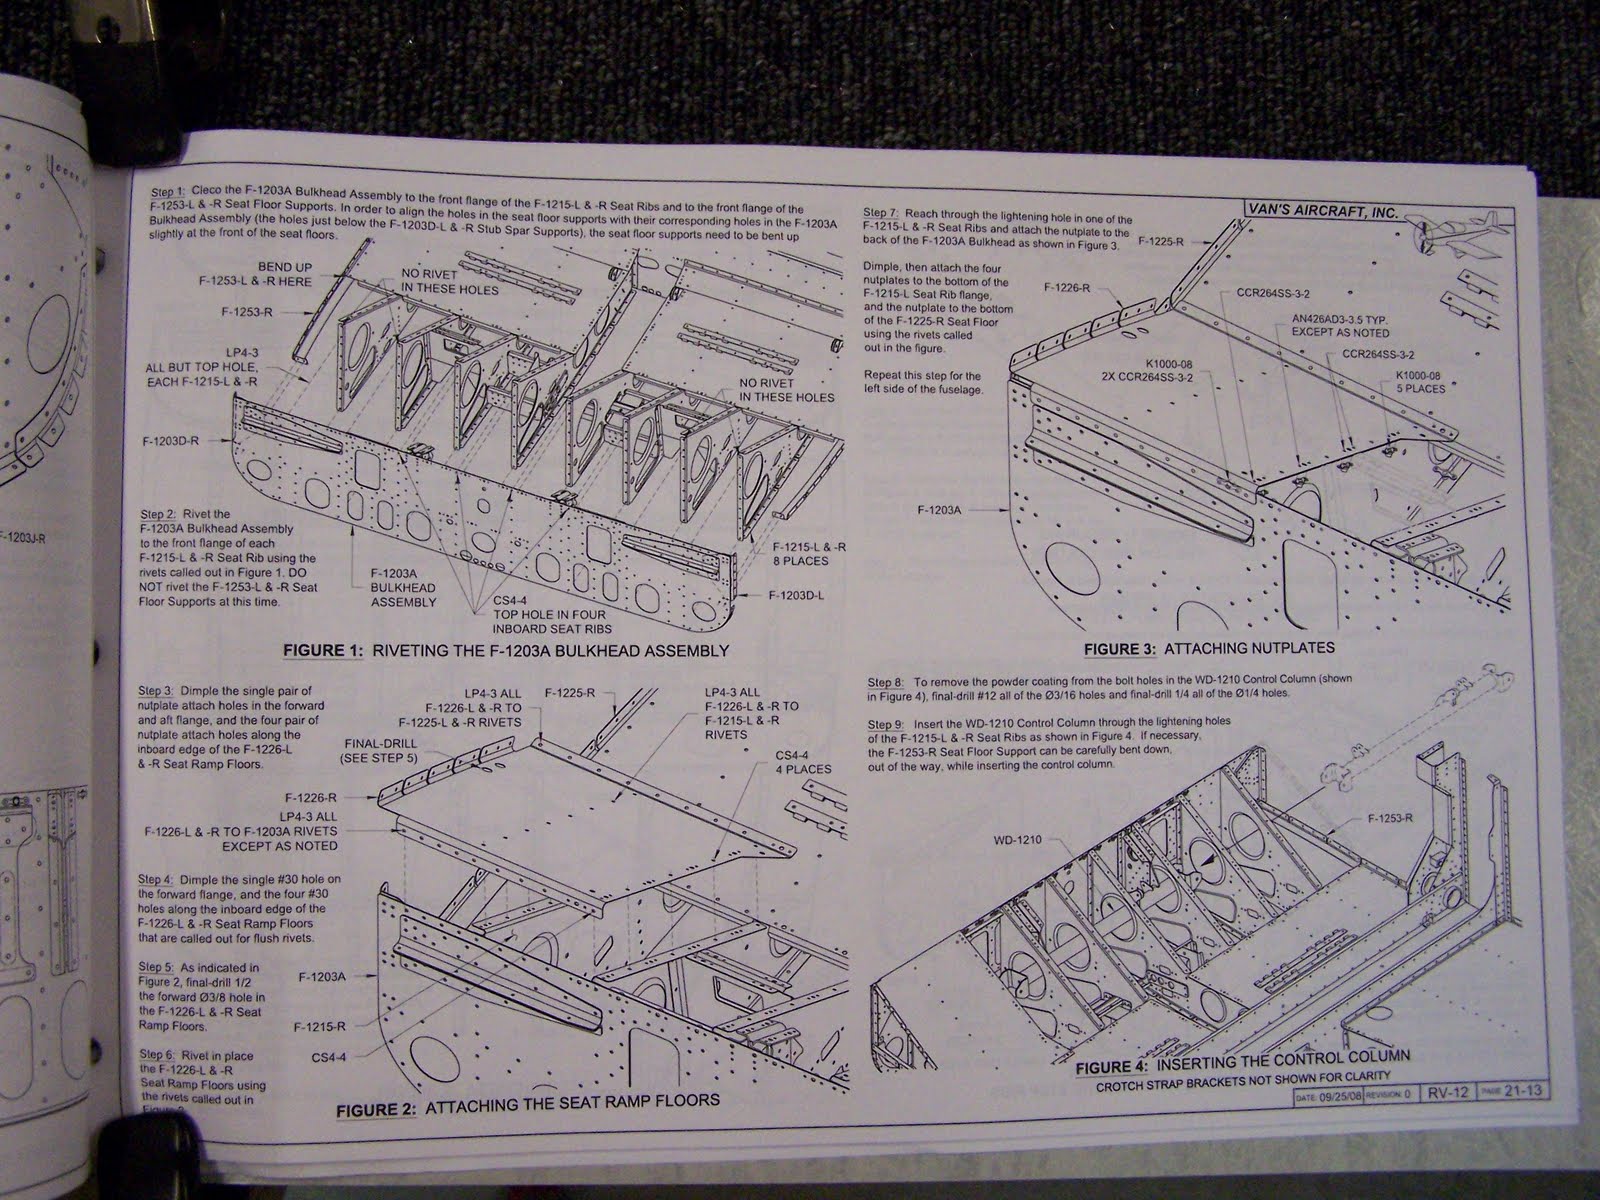
Step 4 is a bit tricky as the lighting hole is quite undersized for my hands:

This is the lighting hole:


This is my hand in the lighting hole:

Actually only 2 fingers will fit, tough to hold the nutplate in place


You need lots of trials and patience but you can do it!

Working on my 2010 Tax Filing

What more do I need to say?
Yes, I know, at some point I will have to pay the NC sales tax on my -12
...

Wednesday, March 30, 2011

Pages 21-17 / 21-18


Nothing particular with these two pages, just the typical cycle of small parts manufacturing, riveting and deburring. Interesting to see the steps attached although there is not yet a lot to step into this fuselage.


For Step 9 Page 21-17, I did not seal the openings with the gas tank sealant because I don't intend to build the gas tank now that it is an option factory built. I used "Great Stuff" which worked great, as advertised!


Sunday, March 27, 2011

Why Vieille Burette?

Someone looking at this Blog may wonder why this title. I explained it at the beginning but this explanation is now buried deep: Here it is

Saturday, March 26, 2011

A mystery visitor

This is a quiz for EAA 1114 chapter's folks: can you identify this mystery visitor who invested one rivet (just labor, not material!) in my plane?

Thursday, March 24, 2011

Page 21-16 : I hit the bottom!

This is what's at stake:

First challenge, there is a gap of about 1/4 inch between the holes of the skin and the holes of the ribs over the baggage compartment (lower half on the picture). After analysis, this is caused by the assembly sitting on the table with both ends pushing up. Having the assembly resting on a 2X4 positioned in the middle tunnel allowed the baggage area to bend enough to adjust for the gap.
I clecoed the bottom skin before completing step 2. This allowed to work on a stable skin while riveting the nutplates.
After hitting the bottom I see nutplates hell!
There are four nutplates per access hole, 5 access holes time 2 rivets: a total of 40 AN 426 rivets to set with the squeezer. First let's get orbganized, the AN426 rivets are easy to set so I don't need my handle extensions which makes the squeezer lighter to handle. Second I need to inspect the nutplates under the skin to see if they are well positioned before riveting and to check the rivets once they are set. here is how this is done:


I lock the nutplate with a self locking miniplier and inspect below with a miror before and after squeezing.
Here is the result one hour and 20 nutplates later:
If you enlarge you will see the 4 nutplates around each hole.


Now I'm ready to rivet the bottom skin but it's too late so I will call it a day, a day in which I hit bottom, saw nutplate hell and survived to face more building challenges... tomorrow

Wednesday, March 23, 2011

Page 21-15 Let's go upside down!


All page steps done in half a day. Just needed help from Michèle to turn the fuselage upside down.


And here is the result:


Tuesday, March 22, 2011

Page 21-13 & 14: I'm in control!


Page 21-13: Another nice riveting run with nutplates and all kinds if rivets. One missed nutplate that forced to drill out the AN 426, easy! Just watch out that the rivet is going through the nutplate hole!


Page 21-14
Here things get interesting.

Inserting the two washers on each side of the control column mount assembly is a challenge because of the tight space. The solution: glue the 2 washers with super glue, then you have only one super washer to slide in. The instruction is not very helpful with their suggestion to use tabs (what is it?) or tape - give me a break!


Here is the tight space where you can see my super washers


As far as I am concerned, I'm happy with the result.
The control column is secured.

Yes, now I am in control!

Saturday, March 19, 2011

A full day of Aviation "sans" building!

First, our monthly meeting of the EAA Chapter 1114 with guest speaker from the USDA's Wildlife Services. Subject : Wildlife conflicts at Airport. We even got a brochure titled "Strike One - You're Out"! Not very encouraging but a good attention getter. Nice weather too so many airplanes at Cox field, scattering in all directions after the meeting to enjoy their first Spring fling.
I left Cox field by car :-( for Carthage's Gilliam Mc Connell air field where a ceremony was planned for the inauguratioin of a memorial for Jame Mc Connell a hero pilot from World War I who originated from Carthage. Here is what I wrote for the folks of the chapter who could not attend:

Finally the commemorative plaque sent by France in 1917 to honor the sacrifice made by James Mc Connell when he was shot down during 1rst World War found a home today. Roland Gilliam acting as MC did a great job keeping this dedication low key but dignified. A few local dignitaries made thoughtful remarks about Mc Connell's dedication and courage in his fight for freedom on a voluntary basis at a time the USA was not yet at war. An historian of 1rst World War gave us details about Mc Connell's last combat: previously wounded with a broken back, he left the hospital incompletely healed: His mechanics had to haul him into his plane. This probably hampered his capability to locate enemy planes coming from behind.

I was probably one of a few that could read the writing (in French) on the plaque and I felt good that such a hero was recognized so early by France (prior to his demise he had been already awarded the "Croix de Guerre" the highest award for courage in time of war).
As a coincidence, and well noted by one of the speakers, President Sarkozy showed leadership today on the Libyan theater. I hope this will help bury the bad feelings created when Chirac prevented the overfly of France some thirty years ago by USAF fighters on a mission to punish (already!) Qaddafi.

Kent Misegade, our peppy EAA chapter president took pictures of the event which was accompanied by an airshow including a missing man fly over formation. By the way I learned at this memorial the origin of "Gone West", a term used for announcing a deceased pilot: during the missing man formation, the plane which breaks formation symbolizing the missing man usually goes West.

Friday, March 18, 2011

Page 21-12 : not a bad day after all!


This page entails lots of riveting with several types of rivets and therefore several riveting tools. The Avery squeezer was used with several rivet sets, almost the whole gamut.
Not a lot of challenges, only a few rivets tricky to squeeze, mostly nutplate rivets located close to obstructions leaving little room for the squeezer's head. I continue to be amazed at how a good job my handle extensions of the Avery squeezer perform on AN 470 rivets (if you are not familiar go back to my early postings on the subject). I wonder how other builders cope with this clearly underpowered squeezer with its stock handles.
After a satisfying day (for a builder any day without frustration is a good day!) I was able to leave the workshop early but not before proudly displaying the fruit of my labor. Note that the door of my workshop were open to enjoy this first real spring day with temperatures in the low eighties. (You will need to enlarge the pictures to appreciate the workmanship!
:-)


Thursday, March 17, 2011

Page 21-11


Here are the instructions:


And here is the result: see next post

Wednesday, March 16, 2011

Page 21-10

Here we go:
Once again, we are going back in the manufacturing mode. Nothing tricky in the first six steps, just lots of deburring and also some prepping as there are three parts of pure AL alloy not Alclad. Also note that the double flush rivets on the control column mount assemblies are not really flush on the shop head side. As long as the rivet is the correct size and the double countersinks are made per the rivet head spec, I don't think this is a problem. In any case I will know later when the assy is installed.
At step 6 I had a problem: there are 4 #30 holes that have to be final drilled at 7/16 and 3/4 of an inch. Could not find any drill bit of this size in my tool kit so I went to Lowe's to buy the corresponding bits - fount the 7/16 but could not find a 3/4. Looking through the alternatives, I locate this unibit which has the sizes I need and I have an epiphany: a unibit is part of the tool kit but I stored it with the countersink/dimple dye tools!Is this what they call a senior moment? May be not, in a real senior moment I would have bought this unibit again! Close call!
Back to the shop, without spending a dime, found the unibit and did the job like a cinch:


-->

Saturday, March 12, 2011

Page 21-08 & 21-09

At last, all assemblies begin to be stitched together


There is some tricky riveting as there is not enough room for the pneumatic rivet puller:
The hand rivet puller from the Avery tool kit saves the day!

Just enough room once the left and right seat assemblies have been propped up:

This provides just enough room for the manual puller to operate.

Then page 21-09 disaster strikes on step 3!


The An3-24A bolt refuses to screw into the nutplate:


The nutplate is too small for an AN3 bolt, my mistake!
Here is how this mistake happened: the bag containing nut
plates had three different sizes that I sorted and put into a drawer:

I thought the sorting was K1000-3 then 4 then 06 by increasing size but the 0 in front of 06 is meaningful which makes the -06 platenut smaller than the K1000-3. I misidentified the K1000-06 as a K1000-3!

The bad news: I have to remove the F1204CL L and R to get access to the platenuts to be replaced (of course I made the same mistake on the right side)
The good news: the two dozen rivets I have to drill out are all pop rivets, easy to drill.

After a couple hours of work everything is A OK and I just feel lucky: the nut
plates could have been in a much more difficult to access location


Friday, March 11, 2011

Page 21-07 Completed


Assemblies of the fuselage are accumulating in my workshop, I am looking forward to stitching them together soon!

Thursday, March 10, 2011

Page 21-06 completed


This page is not problem, except for step 7. If you cut blindly 20" you will be disappointed. Look first at the drawing on figure 4 and you will see that you may have to cut 20 and a half inch, else you will, as I did waste 9 inches of perfectly good hinge stock!

Wednesday, March 9, 2011

Page 21-04 21-05 Completed


Now working on the seat ribs, on which I will sit, one day. Lots of small parts to put together:


On page 21-05, step 11 surprise!
As I have the autopilot option, I have to interrupt and branch to section 39


Section 39 page 02:

F-1269 is part of the Autopilot bracket, it has to be riveted to the rib as indicated above.
However there is a problem:


The screw identified as AN525-10R10 showing in yellow on the picture, cannot be installed because of the nutplate installed in the previous step. I had to drill one rivet of the nutplate and rotate it to allow the screw head to pass. You can avoid this trouble by waiting until Page 32-02 to rivet the nutplate. If you don't, drilling the rivet is not a big deal but why undo what you just did? IMHO. VAN should make the change in their instructions.

Friday, March 4, 2011

A Break From Airplane Building...


... to visit the Cherry Point Marine Corp Air Station with fellow EAA Chapter 1114 members!
Great Time at the best MCAS in the USA: http://www.flickr.com/photos/53928069@N08/sets/72157626074947091/

I also took "pictures of pictures" at the visitor center: I cannot resist grabbing anything related to the Wright Brothers (reminder: Wilbur Wright sounds like "Vieille Burette" in French)
Note: you can enlarge the pictures for more details


Tuesday, March 1, 2011

Page 21-02 Riveting the Baggage Ribs


The main difficulty is to rivet the bulkhead to the ribs with the manufactured head on the bulkhead.
The picture shows why (you have to click to enlarge to see the details):
There is no room for the pneumatic riveter between the two walls. Even the manual puller (shown in operating position on the photo) that comes with the standard kit has barely enough room to operate and you have to struggle when you want to open the jaws to slide the rivet stem. I however confirm that contrary to the previous step, it's doable by the average skilled builder that I am.


Page 21-02 Riveting Baggage Floors

Step 2 is a killer with all the AN 470 solid rivet to squeeze. If you are a novice builder as I am, using the standard tool set, I have bad news for you: there are two rivets that you better not try to set with the 3" yoke that comes with the tool set. These rivets are the AN 470 AD4-10 that are at the outside end of each F-1224. Some builders claim they did it with the 3" yoke but unless you are very skilled, chances are you will, as I did, mess these rivets with it. Just do as I did: borrow a 4" Yoke and you will do the job, as I did, in a cinch. There are no other places where the reach is as tricky it's why I did not invest the $150 for the 4" yoke.
Here are a few pictures that illustrate the problem:


Here the 4" Yoke has room left to position the set correctly while the 3" yoke would touch the F-1204 D and make the positioning marginal on both sides.


The other side where the shop head appears. THe picture taken after the rivet was set shows the flush set easily aligned with the shop head


The job is done and the winner is:


The 4" Yoke!
(kindly lent by Terry Gardner)