Sunday, June 26, 2011

Section 28 Fuel System

This is quite a new ball game: back to school to learn plumbing which explains why, though I worked on this section for the last three weeks I did not have time to blog. Actually at the time I am writing this section 28 is over but I want to provide some highlights of the difficulties I faced for the other builders.
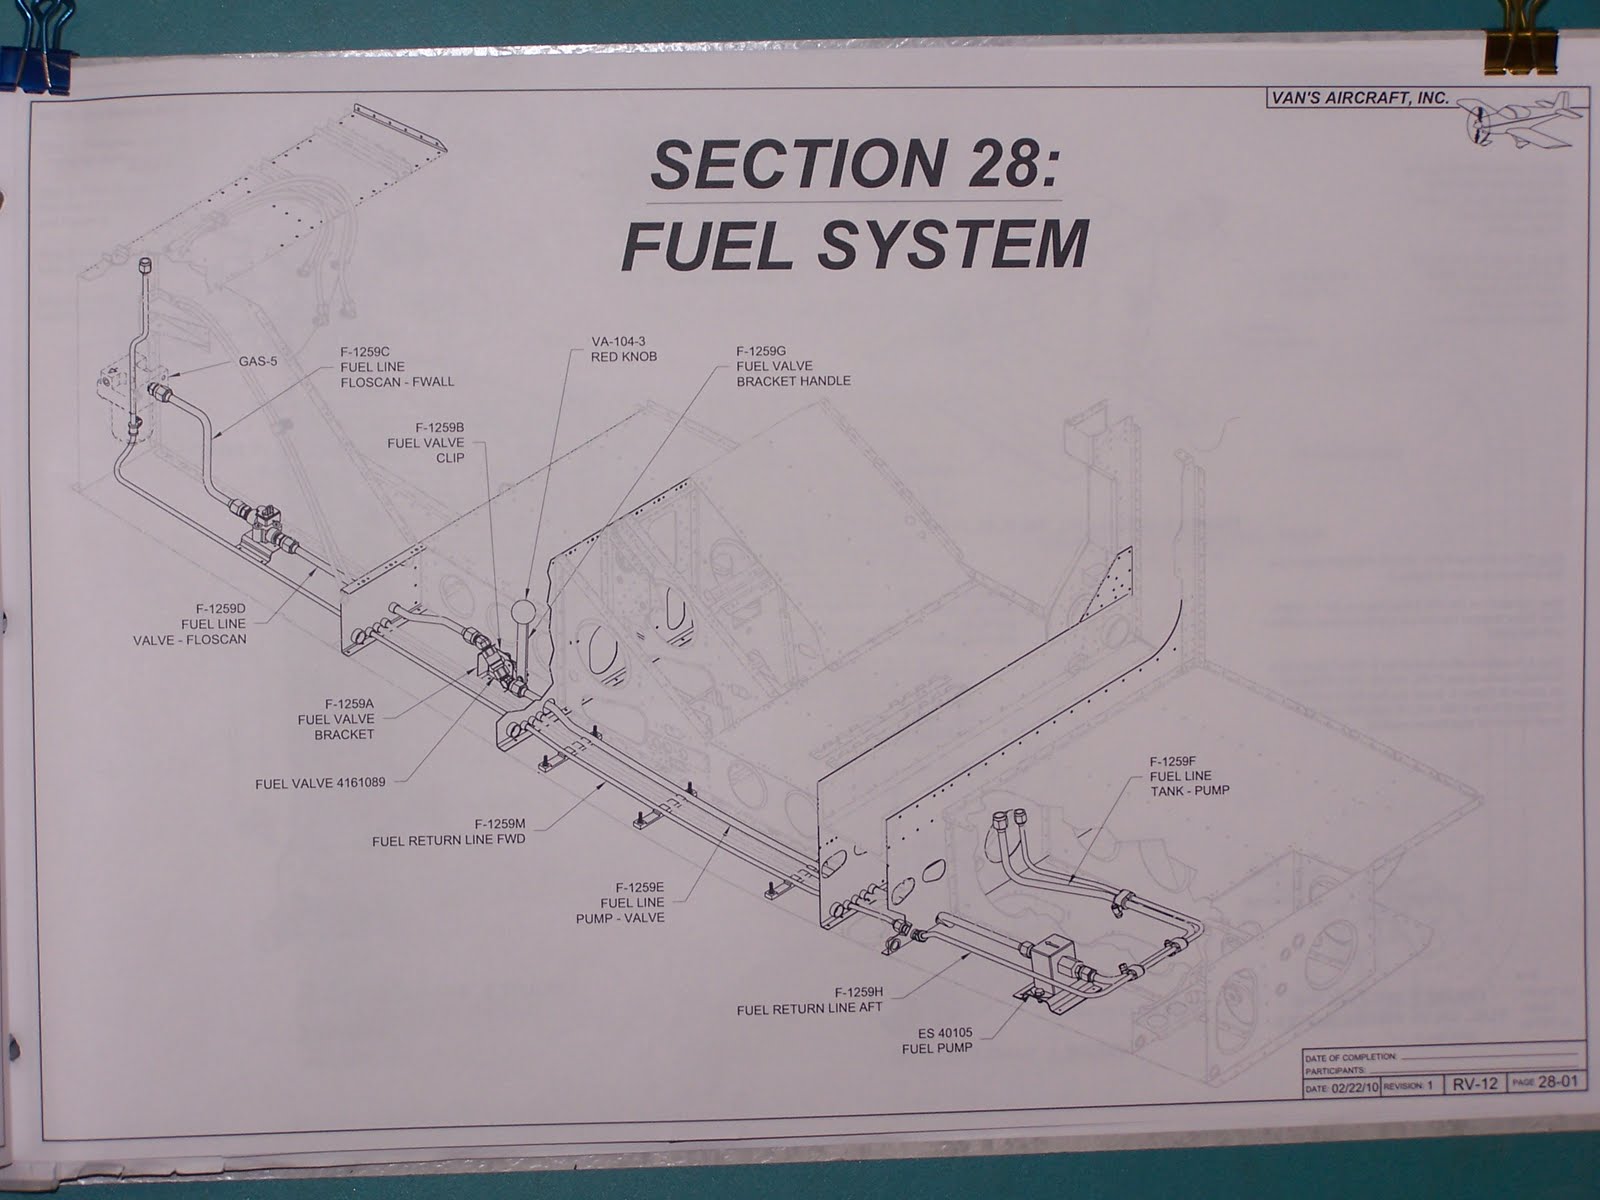
This is what's at stake:
 It's just two lines: the main fuel line and the fuel return line.
So, what's the catch?
Learning how to bend with the tube bender, learning how to flare with the tube flaring tool, learning the names of the fittings by identifying them on the drawings and digging into the parts drawers to find them...
First thing I did was research the VAF forum about this section. The results were not too encouraging. One guy started saying "first order an additional 6 ft of aluminum tube, you will need it". There are indeed many ways to waste the just enough aluminum tubing that comes with the fuselage kit, for example: do the flaring before inserting the fittings on the tube or inserting the flaring in the wrong direction, do the flaring before inserting the tube through the proper snap bushing, and more...

I started with Page 28-02:
My first challenge was the "pipe thread sealant" mention in step 1. OK, I know what a thread sealant is but in aviation there are often special requirements that force you to order online to aviation parts suppliers. My research led me to choose "Permatex with PTFE" because it works both on fuel and brake lines and it is available in local car parts stores. The fuel valve riveting was a bit challenging because it's not possible for one person to reach both sides of the bottom skin. I manage to block the valve in position with a 2X4 and was able to push the rivets in without pushing the valve out... after a few tries.
Then starts the real plumbing business with bending, flaring and all that jazz!

There is another challenge with the bending tool that came with the Avery tool kit: the radius of the bends does not fit the radius on the drawings. This is particularly a problem with the small 1/4" return fuel line. As a result the lengths of tubing indicated in the instructions are not adequate and need to be adjusted. Page 4 is quite a challenge because of the length of the pipe that has to be fed through the bulkhead and several bushings: this snake does not get tamed easily!

 After page 4, page 5 is a piece of cake... well with the exception of the AN 819 fitting that I inserted with its thread sealant before attaching the gascolator to the firewall: always read the instructions carefully
With Page 6, the return line is a tad easier to manage because of its smaller diameter of 1/4" but it's a long one and quite a bit of bending/unbending is required along the way.

 Now for the results of this long fight:
This is the arrival at the firewall with the fuel flow transducer in red

 The fuel valve
 The fuel pump
That's all folks for the fuel system... well, I still have to torque all the flared fittings and check for fuel leaks but before that I will have to build the fuel tank, oh noooo!
And by the way, I did not need to order more aluminum tubing: tada!

Monday, June 13, 2011

27-03 Rudder Pedals installed ... and testing steep turns

The installation of the rudder pedals assembly is a bit tricky and requires some contortion because there is little room to operate wrenches. After one hour of work, here is what I got:


Then on to the brake plumbing but before we need to put this baby on its side.
Testing steep turn!

During flight training I never exceeded 45 degrees in steep turns, here I went all the way to 90 degrees, no help needed, just safety lines attached to the rafters.

Sunday, June 12, 2011

Section 27 : Rudder Pedals & Brake System

Putting the rudder pedals together took the whole day. I had problems getting the brake pedals working smoothly, until I figured that the nut fastening the master cylinders to the torque tube should be left loose. This nut is a castle type and is locked with a cotter pin. Despite this I still had one master cylinder operating rough. The reason was a 1/4 inch gap between the master cylinder head and the flange of the torque tube. I bent the flange to bring it in contact with master cylinder and this solved the problem.

Saturday, June 11, 2011

Section 26 Started...

... and completed. It's about the seat backs, there is nothing to it but deburring, priming, riveting... the usual. Now I can sit in my plane and make airplane noise!

Thursday, June 9, 2011

Done with Section 25

Well, almost as I have to postpone Step 5 of page 25-05 (see picture below) because the bit #36 needed to match drill the holes in the roll bar is absent of the tool kit.

I will have to shop for this uncommon bit size, likely on line.

Wednesday, June 8, 2011

Tailcone Attached, Aft Window Clecoed

Back to building after the hiatus of my checkride.
I was able to attach the tailcone to the fuselage without too much trouble. The alignment was easy thanks to my shortened EAA table (see earlier post) combined with the regular EAA table that I did not modify. The instructions from VANs were helpful. When the mating was done I just hung the tailcone with a sling to the ceiling's rafters.
The Aft Window installation was not that well documented and I had to go to VAF forum and make a search to find out the best method. The difficulty stems from the fact that the window comes as a flat polycarbonate sheet that has to be shaped to fit. The solution that is not documented in the instructions consists in Clecoing first the aft holes and progress toward the front. here are two pictures that sum up the process:
First hold the sheet folded with strings attached to the roll bar


Then start clecoing the aft holes to the turtle neck:


Finally the Aft Window is in place:

Thursday, June 2, 2011

I Got my Ticket!

As of June 2, 2011, I am a Sport Pilot. Here is a picture with my DPE (Designated Pilot Examiner) Zenda Liess, just after the checkride


And one with my CFI, Adam Bowers


 I also want to commend my Flight School B-Bar-D Aviation a family business owned by Doug and Betty Hempstead who are also the owners of the Allegro brand. They are currently restarting the manufacturing of the Allegro LSA in North Carolina.

I am forever indebted to N 50631, the Allegro on which:
  • I had my first discovery flight (with Ross)
  • I made all my student mistakes (despite Ross and Adam!)
  • I flew my first Solo
  • I flew my first Cross Country Solo
  • And finally I got my ticket!


And now let the RV-12 building resume!