... by flying another RV-12!
With fellow builder Kim, we had a rocky start with winds gusting at 20 MPH and the usual mountain wawes that are tough on LSAs:
http://youtu.be/bvPlT49LPKQ
Once at 5,000 feet, things got smoother:
http://www.youtube.com/watch?v=IDdCFDHMDh4&feature=plcp
Thursday, July 26, 2012
Saturday, July 21, 2012
Finally the Flaperon Torque Tubes are Drilled
With Anne help, we went for a delicate operation that I had postponed until the wing retrofit with the new electric plugs. On Friday we started installing the wings with the intent to drill the flaperon torque tubes. We faced a little problem, though. Right wing no problem, the connectors self aligned and the wing went
right in. Left wing, no way to get it in completely, there was still 1/4
inch left to go and no way to go further. Looking at the connectors,
although the guiding pins were engaged, it looked like the casings were
colliding. After more checks, it appeared that the wing connector was
upside down! Easy fix, unscrew and rotate connector 180 deg... Tried to
put the blame on VANS... but page 31A-05 figure 3 warns: Caution:
Orient connectors as shown.
My lame excuse: I was working with the wing upside down when installing the plug...
Here is the picture of the plug once fixed:
 We had a storm coming and had just enough time to bring the wings and fuselage back into the workshop and stop for the day.
Today was the day Anne had scheduled to leave, this did not leave room for error... and everything went well, indeed as these pictures show:
 Preparing to install the wings, you can see the left wing sitting on its "super rack", my solution for one man wing fitting/removal.
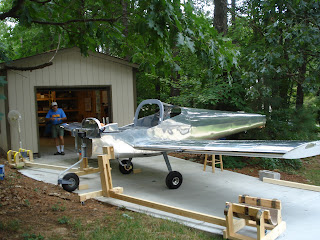 The two wings are on as the two "super racks" sit empty
Time to board!


Drilling in process, viewed through the gas tank filling hole
 One tube drilled and clecoed, one to go!
 All done!
 Anne's turn now!
 Disassembling the just drilled torque tubes with bolts and screws in tight quarters. I'm glad to have small hands around to help!
 Anne is waiving good by after a job well done!
My lame excuse: I was working with the wing upside down when installing the plug...
Here is the picture of the plug once fixed:

Today was the day Anne had scheduled to leave, this did not leave room for error... and everything went well, indeed as these pictures show:


Time to board!


Kneeling in the baggage compartment, this is killing me!

Drilling in process, viewed through the gas tank filling hole


Thursday, July 19, 2012
Full Speed on Avionics!
I took the opportunity of my daughter's Anne visit to go full speed into the avionics retrofit.
We soon were submerged into dewiring some of the old wiring as well as adding new harnesses. The main challenge in section 43C is that it has been targeted at people who had the old avionics, not people like me who wired for the old avionics but never installed any avionics as we were aware of the Skyview coming "soon". Already when you follow the instruction dutifully, it is sometimes difficult to interpret some steps as VANs is not holding your hand closely but here I have first to remove/skip the instructions that refer the D-180 avionics. As the wiring of the old avionics would have change somewhat the wiring that I left unconnected, I have really to understand what I am doing, may be not a bad thing after all but very time consuming. Anne's help sped-up the process by replacing my loud thinking with a dialog filled with disagreements on the interpretation of the instructions. Eventually we found our way through the rewiring including rerouting new harness through an already packed central tunnel and reaching the area where the new ADAHRS (Air Data Altitude Heading Reference System) will soon be installed (about mid tailcone under the top skin). I also really appreciated (and may be somewhat abused) the flexibility Anne's younger age and Yoga practice enjoys compared to my stiff joints and heavier build. To make a story short, she did most of the crawling as shown in the following pictures:
 The toughest part was routing the wires under the instrument pannel
 Look Dad, only one hand!


 Anne viewed from the end of the tailcone, rewiring the ADAHRS

We soon were submerged into dewiring some of the old wiring as well as adding new harnesses. The main challenge in section 43C is that it has been targeted at people who had the old avionics, not people like me who wired for the old avionics but never installed any avionics as we were aware of the Skyview coming "soon". Already when you follow the instruction dutifully, it is sometimes difficult to interpret some steps as VANs is not holding your hand closely but here I have first to remove/skip the instructions that refer the D-180 avionics. As the wiring of the old avionics would have change somewhat the wiring that I left unconnected, I have really to understand what I am doing, may be not a bad thing after all but very time consuming. Anne's help sped-up the process by replacing my loud thinking with a dialog filled with disagreements on the interpretation of the instructions. Eventually we found our way through the rewiring including rerouting new harness through an already packed central tunnel and reaching the area where the new ADAHRS (Air Data Altitude Heading Reference System) will soon be installed (about mid tailcone under the top skin). I also really appreciated (and may be somewhat abused) the flexibility Anne's younger age and Yoga practice enjoys compared to my stiff joints and heavier build. To make a story short, she did most of the crawling as shown in the following pictures:


We hid the extra wires in the central tunnel after making a "neat" bundle

A clean instrument shelf after rewiring


Anne's view of the tailcone while she is sitting in it, rewiring with the instructions between her feet
Saturday, July 7, 2012
Fiddling with AutoCad WS
VANs made the Skyview wiring available in the AutoCad format. No need to have the expensive AutoCad program though as AutoCad allows to work online for free with AutoCad WS. As a test, this is the link to access my own Skyview schematics:
https://www.autocadws.com/main/publish?link=R0hydGVBaWJ3UDVYS1hF
I have the feeling that it is the beginning of a long "friendship" but hey! it could be worse, I could be drawing these wiring diagrams myself... with a pencil!
https://www.autocadws.com/main/publish?link=R0hydGVBaWJ3UDVYS1hF
I have the feeling that it is the beginning of a long "friendship" but hey! it could be worse, I could be drawing these wiring diagrams myself... with a pencil!
Tuesday, July 3, 2012
Flaperon movement obstruction
After installing my flaperons for the first time, I was concerned that the travel in the up direction was blocked by the collision of two rivets heads, one on the flaperon and one on the wing support. Here are pictures of the problem:
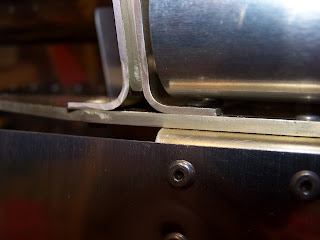 You can see in the slot the two rivet heads in contact.
To allow you to locate these rivets, I rotated the flaperon in the down direction:
 You can see some abrasion of the last rivet on left.
The corresponding rivet on the wing is shown here:
 This is the last rivet at the bottom of the angle, showing also light abrasion.
There is no adjustment anywhere close to this place on the flaperon which means that likely I am not alone to have this problem. The reason why this is not a big deal is that in this blocked position, the flaperon is close to full up deflection as shows below with the middle support:
 Of course I checked the other flaperon and the same blockage exists with the same rivet heads.
The next question is: what happens once the flaperon is connected to the control stick?
I found the answer with the RV-12 of my friend Kim Mitchell who has been flying for one year and a half:
Lo and behold, he has got the same problem, just a little worse: on his left wing the two heads being offset by half a head, both heads have been half ground, letting the flaperon travel beyond the rivets for a full stop. As for the right wing, there was no offset of the rivets which butt head to head with the following result:

The rivet head on the flaperon is gone! The one on the wing is badly chewed:

My conclusion to the RV-12 flying pilots: Gentlemen, check your flaperons!
As for the solution to this problem, I will defer to VANs
In the mean time, here is feedback from VAF Forum:
http://www.vansairforce.com/community/showthread.php?t=88177

To allow you to locate these rivets, I rotated the flaperon in the down direction:

The corresponding rivet on the wing is shown here:

There is no adjustment anywhere close to this place on the flaperon which means that likely I am not alone to have this problem. The reason why this is not a big deal is that in this blocked position, the flaperon is close to full up deflection as shows below with the middle support:

The next question is: what happens once the flaperon is connected to the control stick?
I found the answer with the RV-12 of my friend Kim Mitchell who has been flying for one year and a half:
Lo and behold, he has got the same problem, just a little worse: on his left wing the two heads being offset by half a head, both heads have been half ground, letting the flaperon travel beyond the rivets for a full stop. As for the right wing, there was no offset of the rivets which butt head to head with the following result:

The rivet head on the flaperon is gone! The one on the wing is badly chewed:

My conclusion to the RV-12 flying pilots: Gentlemen, check your flaperons!
As for the solution to this problem, I will defer to VANs
In the mean time, here is feedback from VAF Forum:
http://www.vansairforce.com/community/showthread.php?t=88177
Monday, July 2, 2012
Subscribe to:
Comments (Atom)