
Wednesday, December 29, 2010
Inspection time
Before closing the skins on my left wing, I got the visit of EAA technical counselor Terry Gardner from EAA chapter 1114.
 The inspection was positive: nothing to rework, workmanship all OK which is gratifying for a first time builder. Terry who is building an RV9 was impressed by the ease and speed of building allowed by the pulled rivets which are the fasteners of choice for the skins of the RV-12. The visit reports are filed with EAA and can be used as reference when an amateur built plane is sold. Being an EAA member has its privileges!
Monday, December 27, 2010
Featuring Bernard Paul, French pilot and flight club manager
Bernard is a former collègue from Alcatel and a good friend. He is managing the Flight Club in Lannion, France and on the picture below he just took delivery of a brand new plane called APM 30 Lion from Issoire Aviation, a French GA plane builder. This is a VLA (very light airplane) the European equivalent to the US LSA standard (albeit with a max take-off weight of 1654 pounds, allowing the Lion to be a 3 seater).

In July 2007 Bernard took me and my family on a flight over the picturesque Cotes d'Armor in Brittany. This event definitely influenced my decision to go into flying in my retirement years. The plane we used, in the background, is a 4 seater Robin DR-400, also a French made airplane.


In July 2007 Bernard took me and my family on a flight over the picturesque Cotes d'Armor in Brittany. This event definitely influenced my decision to go into flying in my retirement years. The plane we used, in the background, is a 4 seater Robin DR-400, also a French made airplane.

Sunday, December 26, 2010
White Christmas, kind of...
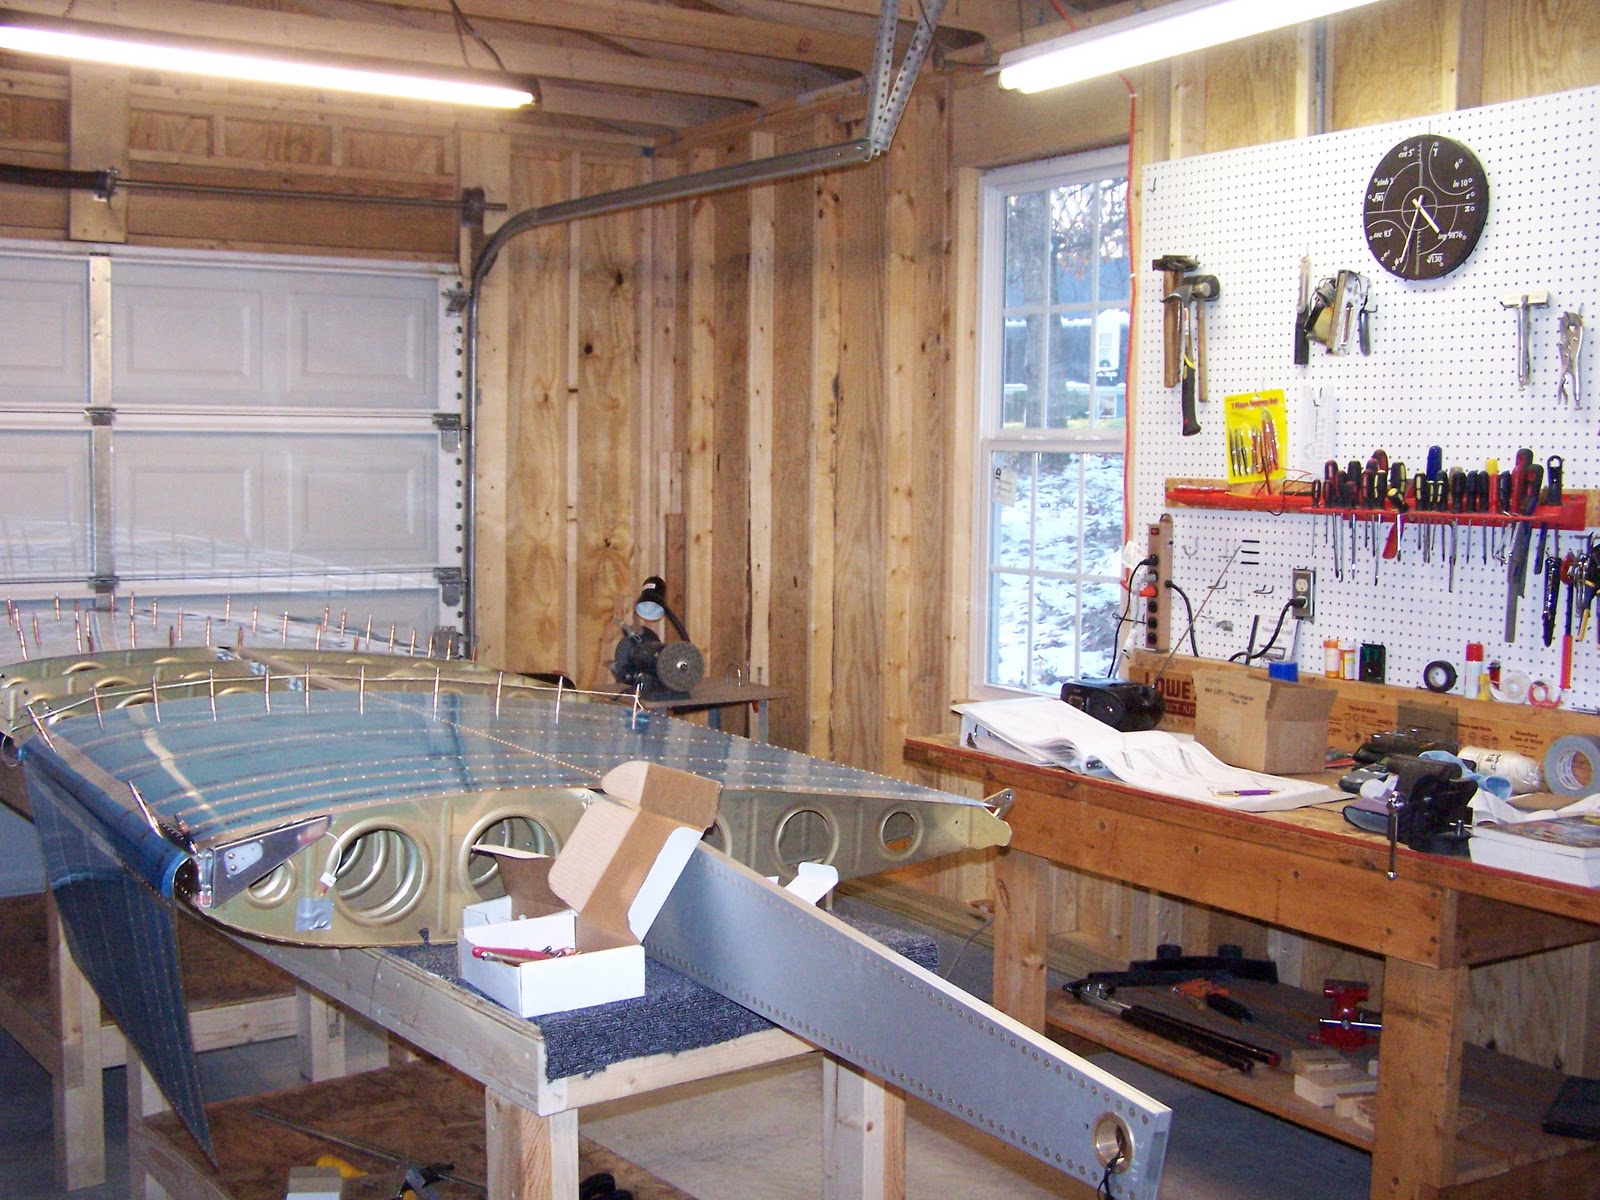
This is how my workshop looks the day after Christmas:
 With temperatures in the lower twenties, work on the wings is almost frozen in its tracks
 Is it rational to work in these conditions?

No, it is not, this is why I have an irrational clock in my workshop, a Christmas gift from my dear wife Michèle (may be a subtle message too?):
 It gives the irrational time spent on irrational activities.
Note that the numbers are at the right place on the dial. For example log 9876 = 3.995 which translates: 3 hours 59 minutes and 42 seconds.
For more on irrational numbers: http://en.wikipedia.org/wiki/Irrational_number


No, it is not, this is why I have an irrational clock in my workshop, a Christmas gift from my dear wife Michèle (may be a subtle message too?):

Note that the numbers are at the right place on the dial. For example log 9876 = 3.995 which translates: 3 hours 59 minutes and 42 seconds.
For more on irrational numbers: http://en.wikipedia.org/wiki/Irrational_number
Wednesday, December 15, 2010
Visit of Denny Smith's RV-12 in Carthage, NC
Kent Misegade, our EAA 1114 chapter president, kindly introduced me to the owner of the first flying RV-12 in the Raleigh region. Denny Smith and partner George Neal built Kit # 120352 in about 9 months, probably a record. They had their first flight December 10 at their field, Gilliam Mc Connell in Carthage, NC. They reported both being thrilled how well the airplane performs and handles. Kent and I had an interesting and rather thorough discussion with Denny, our host about the challenges (there are few) and satisfactions (there are many and more to come) brought by this project. I liked the finish of the interior with carpet, side panels and arm rests that look very professionally made. Denny gave me a couple of useful hints about working on the fuselage: delay riveting the back window to allow access in the baggage compartment which also holds the (should I say infamous?) gas tank. He actually had no problem building the tank but deems the sight glass window (the source of most leaks) not that usable. He also delayed riveting the tailcone to the fuselage until he had to adjust the connections to the empennage, allowing better access to the rear of the fuselage until all work on the fuselage was completed. Here are a few pictures taken by Kent:
N33SN fresh from its maiden flight:

Denny Smith, happy builder:

JP, envious builder:


Trying to make airplane noise :

A neat interior:

Denny and Kent trying to stay warm:

N33SN fresh from its maiden flight:

Denny Smith, happy builder:

JP, envious builder:


Trying to make airplane noise :

A neat interior:

Denny and Kent trying to stay warm:

Saturday, December 11, 2010
First Flight for Hervé Savary's RV7A
Hervé Savary is a French Pilot/Builder on a temporary assignment in Greenville, SC. Hervé was building an RV7A in his workshop in Compiègne, France when this assignment came-up. The rest of the story is documented on his builder's site:
http://www.projet-construction-rv7a.fr/default.htm
I got the opportunity to know Hervé through George Orndorff from GeoBeck to whom Hervé wisely contracted the finishing of his plane while he was on assignment. I found about that while I was taking a Sheet Metal course at George's workshop in Gold Hill, NC. last May.
Hervé kindly documented the event through the following videos:
Le départ / Departure
Le décollage des deux avions / Take off of both planes
L'atterrissage du chase plane, je suis a bord . Landing of chase plane, I am onboard
Passage basse hauteur de N36HS / Low pass N36HS
De retour au sol après 40 minutes de vol / Back on the floor after 40 minutes flight
Tuesday, November 30, 2010
Progress Report on Wings
Sorry, I have let this Blog down during the Thanksgiving period although I continued to work on the wings. The Deburring and Fluting of the Ribs was quite time consuming and when all the parts were ready I took them to the Alodine treatment in Greensboro. I took also all the spars except the main wing spars which are already anodized for corrosion protection.
Here are the ribs all ready for alodine:

Back all alodined on the shelf, ready for wing skeleton assembly:
 Let's start the fun! First the main ribs of the left wing:
One down, 12 to go!
 Left wing main ribs done!
 And on and on...
Here I am done with the left wing that I had to hang to make room for the right wing:
 At this point I am preparing to put the nose ribs on the right wing and the "gotcha" strikes.
When looking for the different nose ribs, I was missing a "forward trimmed" nose rib but I had an extra nose rib which was not forward trimmed: Houston, we have a problem!
As I knew I had trimmed the right number of ribs, I knew that my trimmed rib was somewhere and the only placed would be... on the left wing (hanging on the left) at the wrong place.
I found it there:
 I am already working at drilling out the 6 rivets. Note that the room is limited between the ribs it's why rather than using a drill I am using a small electric screwdriver with a #30 drill. The good news: unriveting went swell.
Note for the builders: there is little difference between a forward trimmed rib and a non trimmed one; this is why I caught this error late. Luckily, I had not skinned the left wing before working on the right wing, following the order of the instruction book. At some point I considered skinning the left wing first because of the lack of space in my workshop, this would have been big trouble!
Then finishing the right wing skeleton was a cinch:
 This is where I stand today, the last day of November 2010.
I just ordered the fuselage kit which should arrive in 8 weeks which put the delivery end of January. This means I have plenty of time to finish the wings (and find out "where in the world am I going to store them to make room in my workshop". Note: vertical stab and stabilator are already using a guest bedroom).
Brief count down:
Fuselage 2 months: end of March
Finishing kit 2 months: end of May
Avionics 2 months: end of July
Engine 2 months: end of September
Preparing for first flight 1 month: end of October
First flight: sometime in November/December 2011
Here are the ribs all ready for alodine:

Back all alodined on the shelf, ready for wing skeleton assembly:

One down, 12 to go!


Here I am done with the left wing that I had to hang to make room for the right wing:

When looking for the different nose ribs, I was missing a "forward trimmed" nose rib but I had an extra nose rib which was not forward trimmed: Houston, we have a problem!
As I knew I had trimmed the right number of ribs, I knew that my trimmed rib was somewhere and the only placed would be... on the left wing (hanging on the left) at the wrong place.
I found it there:

Note for the builders: there is little difference between a forward trimmed rib and a non trimmed one; this is why I caught this error late. Luckily, I had not skinned the left wing before working on the right wing, following the order of the instruction book. At some point I considered skinning the left wing first because of the lack of space in my workshop, this would have been big trouble!
Then finishing the right wing skeleton was a cinch:

I just ordered the fuselage kit which should arrive in 8 weeks which put the delivery end of January. This means I have plenty of time to finish the wings (and find out "where in the world am I going to store them to make room in my workshop". Note: vertical stab and stabilator are already using a guest bedroom).
Brief count down:
Fuselage 2 months: end of March
Finishing kit 2 months: end of May
Avionics 2 months: end of July
Engine 2 months: end of September
Preparing for first flight 1 month: end of October
First flight: sometime in November/December 2011
Sunday, November 14, 2010
EAA 1114 Visit of the GE Turbine Engines Plant
Shu Fung, from GE and an EAA chapter 1114 member organized today a special visit of the GE plant located in RTP on Miami Boulevard. There were about 25 members, all very interested and a few quite competent about jet engines. The best part of the visit is that Shu who is working at the plant is passionate about the jet engine business and managed to communicate his passion to an already very motivated group. The result: a visit planned for 1 hour and a half lasted close to 4 hours! We even saw the engine Alliance GP7000 that equips the A380, that is, the one that does not blow-up in flight...
A few things we learned about modern jet engines:
- The blades of the first stage compressor move to change their angle of attack in order to fight stall, not unlike the wing of an aircraft. This is of course computer controlled as a stall of the compressor would result in a flame out and a few other bad things for the engine longevity.
- The blades and enclosures of the turbines behind the combustion chamber are cooled by air ducked from the compressor chambers.
- The engine starter is not mechanically linked to the turbine shaft, it is just a compressor that pushes air into the combustion chamber to get the blades moving until the ignition and combustion of fuel takes over
Now next time we fly an airliner, we will know what's behind these big cowlings. Whether this will make us more comfortable flying is another story... Did you say A380?
I like my Rotax 912S.
Friday, November 12, 2010
Wing Ribs: a hefty serving of work
Here is a photo of a sample of the wing ribs:
 I have shown the 2 types on the picture: right ribs and left ribs. On the picture each set is made of a nose rib and a main rib positioned as they will be in the wing.
To put some spice in the building, VANs is not putting the right ribs in the right wing and the left ribs in the left wing. Right and left ribs are mixed in each wing!
As I will have to remove the labels identifying left and right ribs for the alodine treatment, I needed a way to identify them, hence this picture.
There is a total of 28 nose ribs and 28 main ribs. each set (nose,main) has a total of 140 holes including the lightning holes that are visible on the photo. Each and every of these holes need to be debured... for a total of about 4000 holes (3000 of which will receive rivets). Once the deburing is completed and after alodine treatment, each rib will have to be fluted: Why?
Below is the reason:
 You see that the darn rib is not flat which means that the holes of the flange will not align with the holes of the skin. The fluting consists in making small creases on the flang (preferably between the holes!) until the rib lies flat on the table. This process is very time consuming.
My guess is that the time spent on the wings is 80% deburring + Fluting and 20% fabricating and assembling.

To put some spice in the building, VANs is not putting the right ribs in the right wing and the left ribs in the left wing. Right and left ribs are mixed in each wing!
As I will have to remove the labels identifying left and right ribs for the alodine treatment, I needed a way to identify them, hence this picture.
There is a total of 28 nose ribs and 28 main ribs. each set (nose,main) has a total of 140 holes including the lightning holes that are visible on the photo. Each and every of these holes need to be debured... for a total of about 4000 holes (3000 of which will receive rivets). Once the deburing is completed and after alodine treatment, each rib will have to be fluted: Why?
Below is the reason:

My guess is that the time spent on the wings is 80% deburring + Fluting and 20% fabricating and assembling.
Wednesday, November 10, 2010
Updated list of Builders Web Sites... and more
As my list of RV-12 builders is buried deep into my Blog, I will refresh it regularly through these postings. Just go to:
http://vieilleburette.blogspot.com/2010/07/list-of-rv-12-builders-sites.html
http://vieilleburette.blogspot.com/2010/07/list-of-rv-12-builders-sites.html
Tuesday, November 9, 2010
Built myself a deburring station
Took the opportunity of a cheap worktable on sale at Northern Tools. I also bought a cheap drill for the 2" Scotchbrite wheels which I attached to the table. It is easier to hold the parts which are light than the drill. Notice the vacuum cleaner nozzle under the deburring wheel to get rid of this nasty Al dust. The main advantage of the table is that I can, weather permitting, do the deburring outside the workshop.
This workstation will come handy for the deburring of the 56 wing ribs starting tomorrow.

This workstation will come handy for the deburring of the 56 wing ribs starting tomorrow.

Sunday, November 7, 2010
My workshop tested by EAA Chapter 1114...
Saturday Afternoon I had a visit by a few members of EAA Chapter 1114 as part of the Workshop visits organized by fellow member Hari Gopalan. Below is a picture of one visitor who is aspiring to become the youngest FAA DAR ever:

Dylan Troy, 4, reflecting (no pun intended) on the quality of my riveting of the Vertical Stab. (Photo by Dad Barry)
I had a great time as it was an opportunity to boast about my work, an activity people of French stock enjoy greatly... (just self-deprecating as my American acquired culture kicks in...)
Saturday, November 6, 2010
Alodine treatment tested
Went to United Metal Finishing in Goldsboro to have a batch of parts treated. Below is a picture of the result on the Stub Spar Assembly (all parts treated before riveting - click on picture to enlarge for more details on the finishing)


Wednesday, November 3, 2010
Not too much to show these days, unlike Republicans!
I have suspended following the instructions of section 14 (Rear Spar, Stub Spar, Hinge brackets) to make a decision about priming. Section 14 requires quite a bit of riveting and once riveted, the parts cannot be primed. I am not an avid Primer for two reasons: it is not required by VANS for most of the parts as most parts are Alclad. There are endless debates about the necessity to prime beyond what is recommended by VANS. The most compelling case for priming everything, including Alclad parts is for those who will keep their plane in a coastal area because of the saline atmosphere. The second reason has to do with the extra work, hazardous nature of the chemical products involved and all precautions that have to be heeded to make the priming process safe. I took the advice of a fellow EAA chapter 1114 builder, Noel Fallwell. Noel has been through the full priming enchilada with his RV7 and his position, in retrospect, is that he would not do it again. He gave me a good lead to solve the problem of parts on which the Alclad has been removed by the manufacturing process (i.e. deburing, countersinking, ...): use an Alodine treatment. The interest of the Alodine treatment is that it is a chemical reaction that does not add weight and that provides good corrosion protection. The other interest is that it is a cheap treatment to have subcontracted. Noel gave me the address of a Greensboro company that he used in the past and I was able to confirm their rate ($50 a lot which is all what fit in one basket). They use two baths, one for cleaning and one for "alodining". An additional plus is that they can provide your batch treated back the same day.
This is what I will do for the wings. The consequence of this decision is that I had to debur all parts I want treated before taking them to Greensboro, hence the little hyatus in my building process.
More soon....
This is what I will do for the wings. The consequence of this decision is that I had to debur all parts I want treated before taking them to Greensboro, hence the little hyatus in my building process.
More soon....
Wednesday, October 27, 2010
Section 13 Spar Assembly

Nothing challenging, job done over two days for a total of about 8 hours of work.
Sunday, October 24, 2010
Took a week off to watch the Fall colors in the mountain
Back in the workshop, inventory completed: not a part missing in the hundreds listed in the inventory by VAN's. These folks are amazing, they really know their stuff about the kit business and this results in less aggravation for us, the customers. I have now to do some home work on the issue of priming for the wings. My preference is to minimize priming to only what needs protection: bottom line, I do not want to prime inside alclad parts. The question is then: what's left that needs priming inside the wings?
Friday, October 15, 2010
The Wing Kit has arrived!
Two crates, one long slim for the spars and one fat and heavy for the rest. Both crates are visible on the picture:
 Inventory on the way. The skins of the leading edge of the wings that are visible on the picture do not fit on my shelves, I will have to cut one stud between two shelves to stow the skins which are roughly 4ft X 4ft. As you can see, the crate containing the spars fits well under the tools workbench because it is cantilever with no legs (no, I'm not that smart, just lucky :-)).
And now I have to order the fuselage soon as I expect to complete the wings around new year and there is currently an 8 weeks lead time (BTW, it has gone down a couple weeks lately).

And now I have to order the fuselage soon as I expect to complete the wings around new year and there is currently an 8 weeks lead time (BTW, it has gone down a couple weeks lately).
Thursday, October 14, 2010
Green light for delayed empennage attachment
The fellows at VAN's Airforce Forum confirmed that the empennage attachment to tailcone can be postpone at least until the work starts on the fuselage. I found a nice temporary resting place for the tailcone: out of the way but not out of sight...
 These empty shelves are crying for help: Bring the wings, bring them on, I'm ready!

Wednesday, October 13, 2010
Now What?
The wings are coming Friday but after the Tailcone is completed there is Section 11: Empennage Attachment. If I do it now I will have to store the wing crates in my garage which is not a problem but once I have done the empennage attachment I will have to undo the work to clear my workshop for the wings build. I do not see why I could not postpone Section 11 until I have done the wings and stored them but to make sure I have asked the advice on my fellow builders on VAF. We will see tomorrow what they say.
Tailcone finished, now what?
I just completed the riveting of the skins of the tailcone, a very satisfying task that resulted in something that begins to look like an airplane as the following pictures show:
 On this picture you can see that the shelves in the background are empty: I have used all the parts: Time for the wing kit to come!

Now the classic view of the cascading ribs (every builder does it!):

I got another assist from Schmetterling when installing the trim wire as I described in this posting on VAF Forum.
Overall the instructions were quite useful with just a few omissions that could be worked around through educated guess or going to other builders sites like Schmetterling, my favorite. I found out that Schmetterling has a tendency to make the same mistakes that I do, so now I first read his log and learn from his ordeals which he does not hesitate to document in a very unselfish way. Thank you Schmetterling!
Thursday, October 7, 2010
Tailcone: Page 10-04 = Mission accomplished!
Thanks to the wise guidance of my fellow builders on VAF RV-12 Forum, I finally overcame the issues mentioned in my last post. I did not need to buy new tools, I just used the Hand Squeezer and manual as well as pneumatic rivet pullers to complete the task. It was not easy which makes this milestone even sweeter.
The most challenging so far but I would bet there is more ahead!

The most challenging so far but I would bet there is more ahead!

Tuesday, October 5, 2010
Tailcone: Page 10-04 = Mission Impossible?
I don't see any way to set the following rivets with the Avery Hand Squeezer:
The rivets in question are supposed to go into the four holes that are just above the line of five rivets already set. There is not enough clearance to position the Avery Hand Squeezer because of the bracket in the way.

Yes, I know there is a smilie! Just a rivet that is making fun at my helplessness...
Tuesday, September 28, 2010
The dynamic of RV-12 builders
This photo album shows the progress of RV-12 completion: over one year 53 have been completed and the rate is now almost one per week:
RV-12 flying
RV-12 flying
Saturday, September 25, 2010
Something to savor
While I am laboring on the deburring of the tail cone skins, I enjoyed the following article and movie about the RV-12:
http://www.aopa.org/members/files/pilot/2010/october/feature_rv12.html
... but I will have to wait to fully savor, oh well...
http://www.aopa.org/members/files/pilot/2010/october/feature_rv12.html
... but I will have to wait to fully savor, oh well...
Tuesday, September 21, 2010
Section 9 - Stabilator Completed
Here is the finished product:

The rod sticking out is the counterbalance arm with its weights resting on the chair. Missing are the two anti-servo tabs that were built previously but not installed yet at this stage.
Surprisingly and notwithstanding the complexity of this component, I faced little challenges and had to drill-out just a few pop rivets (no solid rivets, thank God!). I think that there is a step missing in the instructions somewhere, although I may be wrong. I summarized this issue in the following picture which shows the instruction page with my notes:


 If anyone who has been through the stabilator has a comment about this missed hole, I would love to here from you in the comment section below.

The rod sticking out is the counterbalance arm with its weights resting on the chair. Missing are the two anti-servo tabs that were built previously but not installed yet at this stage.
Surprisingly and notwithstanding the complexity of this component, I faced little challenges and had to drill-out just a few pop rivets (no solid rivets, thank God!). I think that there is a step missing in the instructions somewhere, although I may be wrong. I summarized this issue in the following picture which shows the instruction page with my notes:


Friday, September 17, 2010
Page 09-08 : Stabilator Skinned!
Another good run with the pneumatic rivet puller. Blessed be VAN's for their choice of pulled rivets for the RV-12!
Stabilator clecoed & half skinned:

Stabilator fully skinned ... and 520 rivets (2 hours) later:

This is called a "Stabilator Assembly" because a few pieces are still missing (no anti-servo tabs).
The few clecos that are still visible correspond to holes that will be riveted later: caution if you are an artist riveter, mark these holes carefully lest you fill them unwittingly.
Wednesday, September 8, 2010
Page 09-06 : Stabilator Skeleton Assembly completed!
This is the largest assembly completed so far:

The nice thing is that all ribs are fastened to the Spar Box Assembly with Pop rivets, however most of these rivets are close enough to ribs flanges to require the use of the wedges that were manufactured in page 06-02. If you do not use these wedges, the rivets may not set properly and will have to be drilled out. Luckily, this did not happen this time.

The nice thing is that all ribs are fastened to the Spar Box Assembly with Pop rivets, however most of these rivets are close enough to ribs flanges to require the use of the wedges that were manufactured in page 06-02. If you do not use these wedges, the rivets may not set properly and will have to be drilled out. Luckily, this did not happen this time.
Notched Ribs Saga
I got quite an interesting debate on VAF Forum on the subject.
Here is the link to this debate: RV-12 VAF Forum
My conclusion is that I have to trust VAN's on the safety issue or else there is no point continuing to build my RV-12. However VAN's is playing with its reputation by delivering parts that have been repaired and therefore are "second grade" as a fellow builder said.
Sunday, September 5, 2010
It's Sunday: What would the Wright Brothers do?
When they left for the outer banks, they promised their father, Bishop Milton Wright, that they would never break the Sabbath by working. On Sunday December 13 1903, hard pressed by time to complete their 1903 tests and go home and just a few days before their now famous December 17 first flight, they spent most of their day inside their shed reading...
Saturday, September 4, 2010
Page 09-06 : Something fishy with HS1204 ribs
I found several notches in the big holes carved in the ribs to make them lighter. These notches are not mentioned or shown on the drawings and seem to serve no purpose. Here is a couple of examples:


Page 09-06 : Mea Culpa!
I did exactly what I recommended other builders not to do: I did not read the instructions with enough attention and made a mistake that costs me 12 rivets drill out! How humbling...
I will elaborate later
I will elaborate later
Thursday, September 2, 2010
Stabilator: An Orgy of Squeezed Rivets!
To make my points, there are 56 squeezed rivets on the picture and it's only a small part of the stabilator:

Some are barely visible because they are countersunk but the biggies around the two big holes of the counterbalance brackets are AN470-AD4, they are arm and wrist killers... unless you use my improved Avery Hand Squeezer.
Besides the riveting, this is the first really complex component I have been building. It takes a while to gather all parts from the inventory. Although my inventory is well organized, the original packaging in sub-kits by VAN is not intended at regrouping the parts belonging to a specific component and you have to fish from several sub-kits packages. It may take a while to dig out a component buried deep and without the check of the inventory a delivery time strongly encouraged by VAN, you would be sometimes tempted to deem a component missing but you know it's here as you did not find anything missing in the inventory.
So far I have been through Page 09-01 to 09-04 without major issues. As much as instructions are held to a minimum by VAN, I am in haw by the accuracy and level of details provided in the drawings. You better watch carefully these drawings because some little details are the key to avoiding costly mistakes. Even if VAN designers cleverly key some components to prevent mistakes (i.e. some holes are a bit offset and will not match if your part is presented upside down or flipped 180deg) it is still possible to mis-position parts that have symmetrical shapes like the Spar Box Assembly.
I would recommend novice builders (I am one too) to:
- Go slow in this section, check and recheck your work against drawings
- As usual VAN instructions are short and every word is important: read slowly and make sure you understand because if you don't you are on your way to disappointment later
- In doubt, go to other builder's web sites/Blogs and research the RV-12 - VAF Forum
If nothing worked, ask the RV-12 VAF Forum a question and in the rare case you are not satisfied by the answers you still can call VAN's support.
At this point in the build, I have not called VAN's yet (although I was tempted a few times and later found that I would have looked a fool if I had done it!)
Friday, August 27, 2010
Section 8 : Anti-Servo Tab
No special problem, completed in a couple of days. A few -3 squeezed rivets were very easy to set with the "improved" Avery squeezer. All other rivets were pop, a pleasure to set with the pneumatic riveter.
Here are the two symmetrical AST completed:

Here are the two symmetrical AST completed:

Tuesday, August 24, 2010
Section 7 Rudder
Another heavy "learning by mistakes" Section.
Let's review page by page what happened
Page 07-02
Step 7: Some difficulties to have the spar caps as flush to the rudder spar as shown on Figure 3.
Page 07-03
Step 1: I had more space than needed for the upper hinge bracket and the upper hinge assembly although it is specified to not put more than one AN960-10 washer. I noticed that when tightening the bolt it is possible to suppress the space. I hope it's OK ...
Step 2: no indication provided about the rivets direction. I chose to put the manufactured head on the side visible rather than inside the skin: big mistake! In this position, the shop head is on the rib side. As the rib is much thinner than the spar, the rivet once squeezed pushes the rib's flange away from the spar! If you put the manufactured head on the rib side, you can push the head while squeezing, preventing the rib flange to move away from the spar. I had the consolation to find out that another builder had made the same mistake but too late (see Schmetterling's blog).
Lesson learned: always read other builders blogs before you make a mistake!
Step 3: The order provided by VAN is wrong because if you first rivet the hinge bracket first, there is a chance that you will create deformation of the spar caps which will not be flushed with the spar when the remaining holes are riveted. You should rivet first the "remaining holes" and then the spar caps.
The rest of the section went pretty well, although I got tired of struggling with the rivet squeezer and managed to do the improvement of the Avery Hand Squeezer listed earlier.
The best part:
Here is a draggy rudder:

And one hour and 200+ pulled rivets later (I kid you not) here is a finished rudder:
 I did it with the help of a pneumatic rivet puller from Harbor Freight: a must for the RV-12 builder and a great investment for $70 (compared to the $300 of the Avery Hand Squeezer).
Let's review page by page what happened
Page 07-02
Step 7: Some difficulties to have the spar caps as flush to the rudder spar as shown on Figure 3.
Page 07-03
Step 1: I had more space than needed for the upper hinge bracket and the upper hinge assembly although it is specified to not put more than one AN960-10 washer. I noticed that when tightening the bolt it is possible to suppress the space. I hope it's OK ...
Step 2: no indication provided about the rivets direction. I chose to put the manufactured head on the side visible rather than inside the skin: big mistake! In this position, the shop head is on the rib side. As the rib is much thinner than the spar, the rivet once squeezed pushes the rib's flange away from the spar! If you put the manufactured head on the rib side, you can push the head while squeezing, preventing the rib flange to move away from the spar. I had the consolation to find out that another builder had made the same mistake but too late (see Schmetterling's blog).
Lesson learned: always read other builders blogs before you make a mistake!
Step 3: The order provided by VAN is wrong because if you first rivet the hinge bracket first, there is a chance that you will create deformation of the spar caps which will not be flushed with the spar when the remaining holes are riveted. You should rivet first the "remaining holes" and then the spar caps.
The rest of the section went pretty well, although I got tired of struggling with the rivet squeezer and managed to do the improvement of the Avery Hand Squeezer listed earlier.
The best part:
Here is a draggy rudder:

And one hour and 200+ pulled rivets later (I kid you not) here is a finished rudder:

Sunday, August 22, 2010
Finally fixed the Avery Rivet Squeezer!
... Not that there is anything wrong with it (to quote Jerry Seinfeld) but...
I have been unable to squeeze consistently the AN4 rivets: too much efforts required to do a good job in one pass. Two passes are a pain because of the need to readjust the gap. Walking in Lowe's store, I found steel pipes in the plumbing section: I bought a 3/4"X30 pipe that I cut in half. I now have handles that are 5 inches longer, just the additional leverage I needed to squeeze in one pass. The 3/4" diameter fits perfectly these sleeves over the original handles. I just drilled holes and put screws (visible on the photo) to keep the sleeves from sliding.


I have been unable to squeeze consistently the AN4 rivets: too much efforts required to do a good job in one pass. Two passes are a pain because of the need to readjust the gap. Walking in Lowe's store, I found steel pipes in the plumbing section: I bought a 3/4"X30 pipe that I cut in half. I now have handles that are 5 inches longer, just the additional leverage I needed to squeeze in one pass. The 3/4" diameter fits perfectly these sleeves over the original handles. I just drilled holes and put screws (visible on the photo) to keep the sleeves from sliding.

This picture shows the difference in length with the original handles:

Now one additional benefit is that the rigidity of the handles is much higher and there is no flex under pressure of the squeeze. This allows a better feeling of where we stand in the squeezing process. Following this modification, I was able to squeeze a dozen AN4 in one squeeze each with an excellent compliance to standards.
Cost: $8
Note that this modification is reversible. For AN -3 rivets, you could remove the sleeves and even put the rubber grips back but I doubt it is necessary
Tuesday, August 17, 2010
This is what it is all about
My friend Peter Van Schalkwyk just completed the 40 hours phase 1 tests on the Waiex (i.e. SONEX with a Y empennage) he built in his garage during the last three years. Now he is free to take passengers and fly anywhere he wants to... and where do you think he flew first ?

Peter and his lovely wife Shayne at First Flight Airport, Kill Devil Hill, NC, August 15 2010
Congratulation Peter for a job well done!

Peter and his lovely wife Shayne at First Flight Airport, Kill Devil Hill, NC, August 15 2010
Congratulation Peter for a job well done!
Monday, July 26, 2010
Started Work on Rudder
These are the components:
 The good news: a small number of components means a good design following the KISS principle so dear to SONEX's folks. For those unfamiliar with the KISS principle, it means Keep It Simple... for the last "S" I'm not sure. If you were addressing a fool who is making things too complicated you could punctuate with "Stupid" but there are no fools in the Kit Plane business: they all crashed long ago.
The bad news: these parts will have to wait until I come back from the mountains.
See you parts...

The bad news: these parts will have to wait until I come back from the mountains.
See you parts...
Subscribe to:
Posts (Atom)