So far I have prepared as much as possible for the first sealing riveting session that will happen to morrow. I have performed a dry run, building the tank with clecos and installing it in the plane, behind the passenger seat. This allowed me to fit the filling neck and position the hole in the top of the tank. My challenge is that I have a finishing kit dating October which is pre SERVICE BULLETIN 11-12-14 which requires the addition of two clips and fungible bolts. The instructions for building the tank have been updated but are based on the updated hardware. Not a big deal as the additional work consists in match drilling holes and drilling the filling neck's hole in the tank top skin. I made my first mistake in doing the latter and had to reorder the tank top skin, my first messed part reorder (not bad for a beginner, although the term is arguable after almost 2 years of building!).
Anyway, I leave my workshop tonight with everything ready: tools sorted and protected with duct tape, skins and parts scored and cleaned for sealing application, rivets sorted, notes taken for tricks and traps unearthed during the dry run and tons of gloves, rags and MEK for the cleaning. I have the feeling that I can do the job on my own but to be safe I invited Terry Gardner, one of the chapter's tech. counselor to assist me for my first sealant application.
Thursday, February 23, 2012
Saturday, February 18, 2012
Great EAA Chapter 1114 Monthly Meeting
The nice weather allowed for a significant number of fly-in planes, among them a yellow RV-12 which came all the way from Jefferson/KGEV.
 I think I know the man in the cockpit!
Another noticeable RV was Dennis Roberts' RV-7:

Dennis is so fast on take-off that I could not catch the plane entirely. Here he leaves for a 2 hours trip to Indiana at 200 MPH.

This is a Piper PA 22 Pacer from 1962 belonging to Darryl Perry from Sanford:
 The meeting was focused on flying tools and applications running on various devices that were demonstrated by the chapter's members using them, a kind of show and tell session.
Another good day at Cox field!

Another noticeable RV was Dennis Roberts' RV-7:

Dennis is so fast on take-off that I could not catch the plane entirely. Here he leaves for a 2 hours trip to Indiana at 200 MPH.

This is a Piper PA 22 Pacer from 1962 belonging to Darryl Perry from Sanford:

Another good day at Cox field!
Friday, February 17, 2012
A Dirty Job in Perspective
This is supposed to become a fuel tank:

And this is how these parts look once put together:

Several challenges lay ahead:
- The dirty part: while riveting, all parts that could be a source of leak have to be sealed with Proseal, a nasty compound, black, gooey which is a mix of two compounds that have a 30 minutes delay before it gets hard and unusable.
- The instructions have to be adapted: following an accident in which the deformation of the central channel on which the tank is anchored led to the tank getting torn open (no fire or casualty thank God!) a modification has been issued after I received my kit. New instructions exist for the new kits and retrofit instructions for the tanks already built but not for my particular case.
I had the option to buy the tank already built but I think I made the right choice building it myself. As a fellow builder told me, on a critical part like this one, who do you trust more you or an unknown shop who put it together for you?
My choice has already been rewarded: had I ordered the built tank, I would have now to tear it apart to implement the modification!
Here I am, "à pied d'oeuvre" as they say in France but more like my back against the wall...
Wednesday, February 15, 2012
Preparing Canopy's Fiber Glass work
These are the instructions for the work to be done to add the fiber glass skirt to the front of the canopy:


As the fiber glass skirt is very visible I do not want to mess this job and decided, given my lack of experience on working with epoxy and fiber to get help. This job is pending the availability of my helper.


As the fiber glass skirt is very visible I do not want to mess this job and decided, given my lack of experience on working with epoxy and fiber to get help. This job is pending the availability of my helper.
Monday, February 13, 2012
124BX It will be!
So, my call name will be "Experimental RV-12 124BX" which I intend to shorten to
"Experimental RV twelve four Bravo X Ray" as the true intent of the name is "12 for BernouX" (unfortunately 124JP was taken)
From my experience a couple of weeks ago flying into Class C, it is sometimes difficult to identify your call sign when said by the controller in the middle of lots of yak yak. Seems to me that "Bravo X Ray' should stand out better than 50631, the call sign of the plane I was flying.
Sunday, February 12, 2012
Mulling a color scheme for my plane
I like Dennis Robert's RV-7 paint job a lot and would like to use it. I like the choice of colors and the simplicity of the patterns used with few curves which makes the paint job easier to draw.
http://www.1114.eaachapter.org/apps/blog/show/9525064-dennis-roberts-rv-7-project-n713dr
Now I just need to find a competent paint shop, easier for a car than for an airplane.
http://www.1114.eaachapter.org/apps/blog/show/9525064-dennis-roberts-rv-7-project-n713dr
Now I just need to find a competent paint shop, easier for a car than for an airplane.
We have a brand new Canopy!
Although I did not post on this blog in more than a month, a lot has happened and progress was made.
Beside the work on the canopy, I was one of the 16,000 participants to the Sebring LSA Show in January. It was an opportunity to attend a Dynon class on the Skyview glass cockpit which will equip my RV-12. I came back convinced that the RV-12 is one of the best Light Sport airplanes on the market and definitely the best Kit. I also found that two major components of my plane: the Rotax engine and the Dynon Skyview glass cockpit have been pervasively adopted by the LSA industry with their competitors just nibbling at the niche market's margin.
On the flying side I flew for the first time into Class C's RDU airport (which is just 5 miles from my home, although I had to drive first 40 miles to KTTA where I flew from on the Allegro). On take off from RDU I was behind a Boeing 727... I felt so tiny!
I also found a plane for transition training in Salisbury, NC. It is a SportCruiser, a low wings LSA that flies just like the RV-12: same engine, same weight, glass cockpit, with light controls and differential braking. I took my first flight with Davis Amos (owner of Amos aviation) as CFI and found it much easier to fly than the Allegro. With 10 Knots of cross wind I had no problem on landing although it was my first flight.
Back to the Kit building, as of today my canopy work is finished as shown in the pictures below. There is lots at stake when working on the plexiglass in a cold workshop and I therefore proceeded very carefully which explains the weeks it took to complete.
Here the canopy has been drilled and positioned for screwing and riveting. The clearances are measured in 1/16 and 1/32 of an inch a very tedious and precise phase with lots of grinding, fitting, regrinding, etc...

This is all done, no more clecos!

A view from the inside, canopy closed:

These are the tools of the trade:
A little secret learned from Mark Glazer (EAA 1114): no filing, no sawing, just grinding with fine grit paper or scotchbrite disks, all drilled holes deburred with tiny fast spinning grinding stones.

A little help to keep the plastic warm: a thermostated radiator inside the closed cockpit:

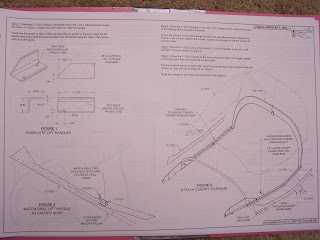
Here are the instruction pages involved and now checked:


A note to the builders:
When fastening the canopy to the rear bow, I faced a problem not mentioned in the instructions: The holes in the rear bow that were punched in the factory are slightly too small for the screws. This results in the screws acting like a tap although the fastening is provided by a nut. This results in the screw head not always being flat on the plastic surface. After calling VANs, I was instructed to enlarge the holes with a #29 drill bit... one more drilling, canopy removing, deburring, canopy mounting cycle!
Want to know how many such cycles I had to go through? Ask my wife Michèle, she helped me carry the canopy on and off!
Beside the work on the canopy, I was one of the 16,000 participants to the Sebring LSA Show in January. It was an opportunity to attend a Dynon class on the Skyview glass cockpit which will equip my RV-12. I came back convinced that the RV-12 is one of the best Light Sport airplanes on the market and definitely the best Kit. I also found that two major components of my plane: the Rotax engine and the Dynon Skyview glass cockpit have been pervasively adopted by the LSA industry with their competitors just nibbling at the niche market's margin.
On the flying side I flew for the first time into Class C's RDU airport (which is just 5 miles from my home, although I had to drive first 40 miles to KTTA where I flew from on the Allegro). On take off from RDU I was behind a Boeing 727... I felt so tiny!
I also found a plane for transition training in Salisbury, NC. It is a SportCruiser, a low wings LSA that flies just like the RV-12: same engine, same weight, glass cockpit, with light controls and differential braking. I took my first flight with Davis Amos (owner of Amos aviation) as CFI and found it much easier to fly than the Allegro. With 10 Knots of cross wind I had no problem on landing although it was my first flight.
Back to the Kit building, as of today my canopy work is finished as shown in the pictures below. There is lots at stake when working on the plexiglass in a cold workshop and I therefore proceeded very carefully which explains the weeks it took to complete.
Here the canopy has been drilled and positioned for screwing and riveting. The clearances are measured in 1/16 and 1/32 of an inch a very tedious and precise phase with lots of grinding, fitting, regrinding, etc...

This is all done, no more clecos!

A view from the inside, canopy closed:

These are the tools of the trade:
A little secret learned from Mark Glazer (EAA 1114): no filing, no sawing, just grinding with fine grit paper or scotchbrite disks, all drilled holes deburred with tiny fast spinning grinding stones.

A little help to keep the plastic warm: a thermostated radiator inside the closed cockpit:

Here are the instruction pages involved and now checked:


A note to the builders:
When fastening the canopy to the rear bow, I faced a problem not mentioned in the instructions: The holes in the rear bow that were punched in the factory are slightly too small for the screws. This results in the screws acting like a tap although the fastening is provided by a nut. This results in the screw head not always being flat on the plastic surface. After calling VANs, I was instructed to enlarge the holes with a #29 drill bit... one more drilling, canopy removing, deburring, canopy mounting cycle!
Want to know how many such cycles I had to go through? Ask my wife Michèle, she helped me carry the canopy on and off!
Subscribe to:
Posts (Atom)