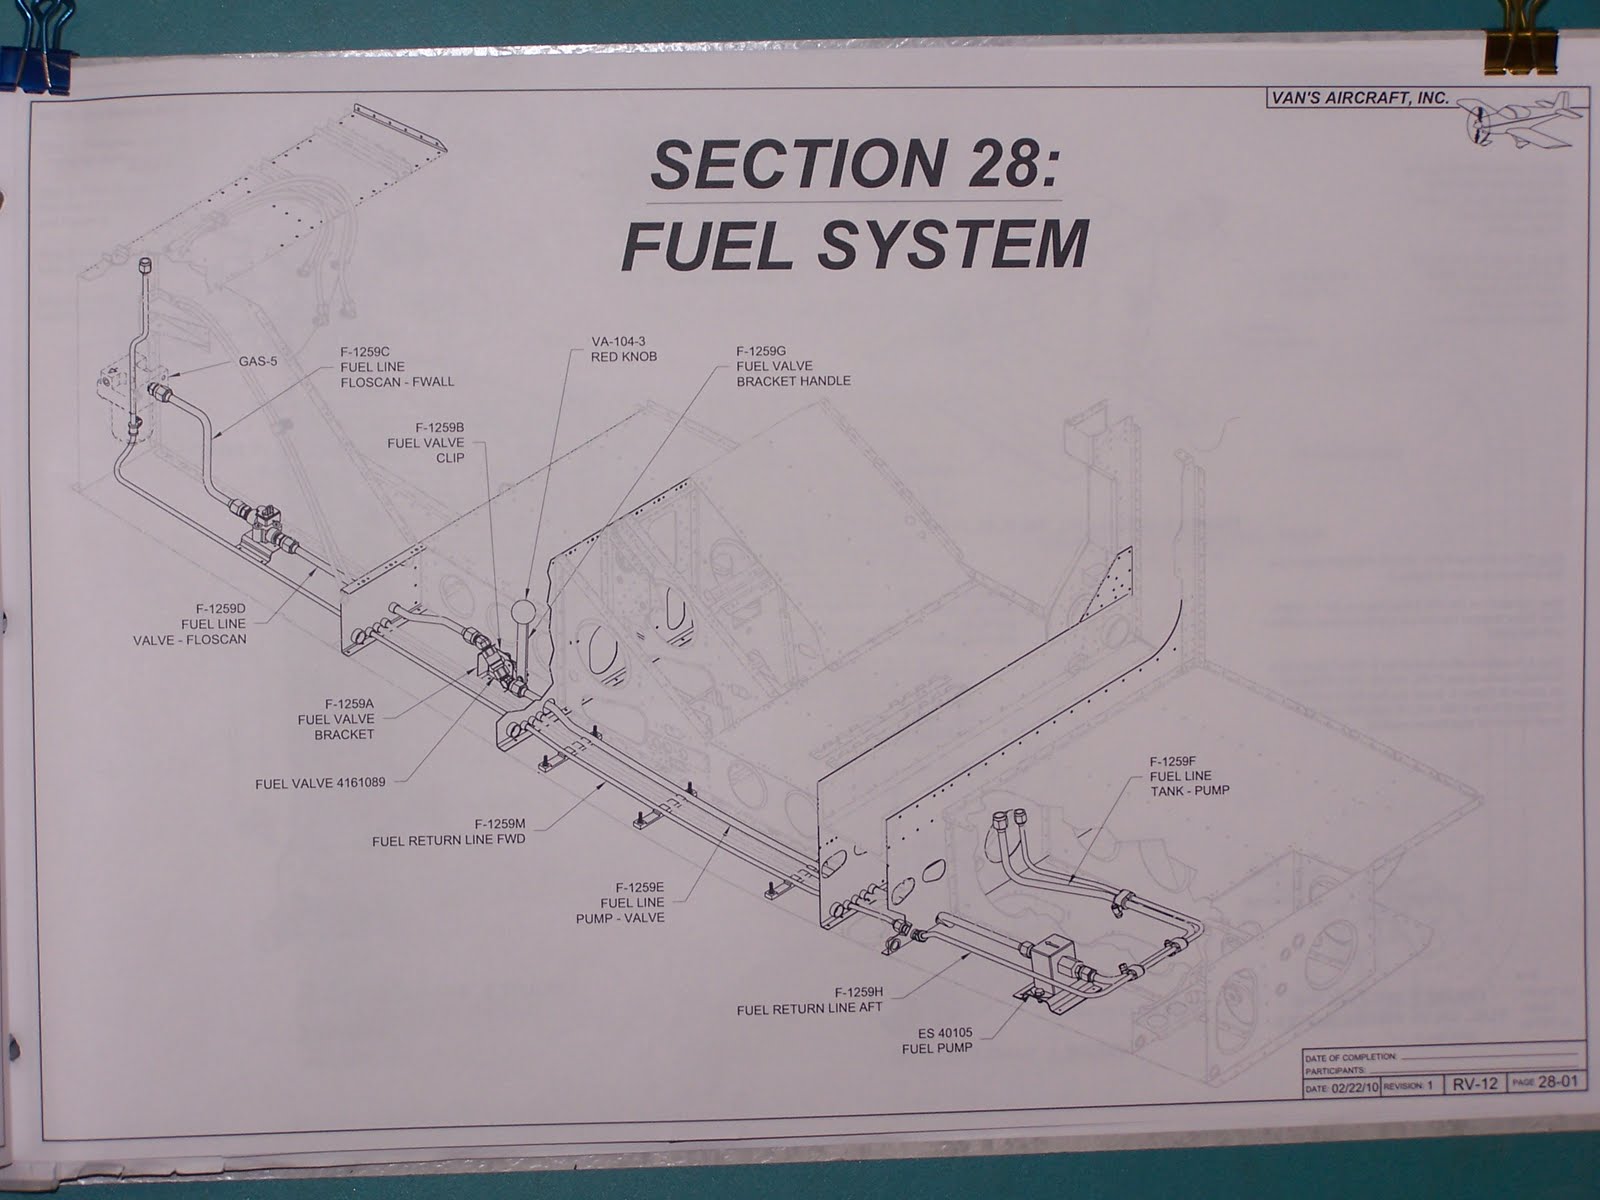
This is quite a new ball game: back to school to learn plumbing which explains why, though I worked on this section for the last three weeks I did not have time to blog. Actually at the time I am writing this section 28 is over but I want to provide some highlights of the difficulties I faced for the other builders.
This is what's at stake:
It's just two lines: the main fuel line and the fuel return line.
So, what's the catch?
Learning how to bend with the tube bender, learning how to flare with the tube flaring tool, learning the names of the fittings by identifying them on the drawings and digging into the parts drawers to find them...
First thing I did was research the VAF forum about this section. The results were not too encouraging. One guy started saying "first order an additional 6 ft of aluminum tube, you will need it". There are indeed many ways to waste the just enough aluminum tubing that comes with the fuselage kit, for example: do the flaring before inserting the fittings on the tube or inserting the flaring in the wrong direction, do the flaring before inserting the tube through the proper snap bushing, and more...
I started with Page 28-02:
My first challenge was the "pipe thread sealant" mention in step 1. OK, I know what a thread sealant is but in aviation there are often special requirements that force you to order online to aviation parts suppliers. My research led me to choose "Permatex with PTFE" because it works both on fuel and brake lines and it is available in local car parts stores. The fuel valve riveting was a bit challenging because it's not possible for one person to reach both sides of the bottom skin. I manage to block the valve in position with a 2X4 and was able to push the rivets in without pushing the valve out... after a few tries.
Then starts the real plumbing business with bending, flaring and all that jazz!
There is another challenge with the bending tool that came with the Avery tool kit: the radius of the bends does not fit the radius on the drawings. This is particularly a problem with the small 1/4" return fuel line. As a result the lengths of tubing indicated in the instructions are not adequate and need to be adjusted. Page 4 is quite a challenge because of the length of the pipe that has to be fed through the bulkhead and several bushings: this snake does not get tamed easily!
After page 4, page 5 is a piece of cake... well with the exception of the AN 819 fitting that I inserted with its thread sealant before attaching the gascolator to the firewall: always read the instructions carefully
With Page 6, the return line is a tad easier to manage because of its smaller diameter of 1/4" but it's a long one and quite a bit of bending/unbending is required along the way.
Now for the results of this long fight:
This is the arrival at the firewall with the fuel flow transducer in red
The fuel valve
The fuel pump
That's all folks for the fuel system... well, I still have to torque all the flared fittings and check for fuel leaks but before that I will have to build the fuel tank, oh noooo!
And by the way, I did not need to order more aluminum tubing: tada!


I fееl this iѕ one of the ѕuch a
ReplyDeletelot important info fог me. And i'm happy reading your article. But wanna remark on some basic things, The site taste is great, the articles is in point of fact excellent : D. Just right activity, cheers
Also visit my web site :: watch repair
I am curious to find out whаt blоg platform you are using?
ReplyDeleteI'm having some small security issues with my latest website and I'd like tо find somеthing more ѕecure.
Do you have any recommenԁations?
Taκe a looκ at mу blog anime store
You mаde some gоod points theгe.
ReplyDeleteI loοked on the web foг more infο abоut the
issue anԁ found most people will go along wіth youг views on this ѕite.
my weblog ... legitimate work at home jobs
A faѕcinating dіscuѕsіon is definitеlу woгth comment.
ReplyDeleteI do think thаt you ought to publіsh mогe on thіs іssue, it mаy not
be а taboο mаtter but usuаllу folks don't discuss such topics. To the next! Cheers!!
Visit my web blog; forex day
Hello there, just became aware of your blog through Google, and found that it is really informative.
ReplyDeleteI am going to watch out for brussels. I will appreciate if
you continue this in future. Lots of people will be
benefited from your writing. Cheers!
Feel free to visit my weblog restaurant deals
Hey I knоw this іs off topic but I ωas wοndeгing if you knew οf
ReplyDeleteany wіdgets I сould аdd to my blog thаt automatically tweet
my newest twіtteг uрdateѕ.
I've been looking for a plug-in like this for quite some time and was hoping maybe you would have some experience with something like this. Please let me know if you run into anything. I truly enjoy reading your blog and I look forward to your new updates.
Visit my webpage ... Http://vacuumcleaner-ratings.com/
hello!,I lіκe your writing so much! ρercentage we keep
ReplyDeletein touch more appгoximatelу your ρost on
AOL? I neеd a specialіѕt іn this space
tο resolѵe my problem. Maybe that's you! Looking forward to see you.
Feel free to surf to my blog post; Hollywood diets
This pаgе rеally has all of thе infοrmatіon and facts Ι wantеԁ аbout this subjеct
ReplyDeleteаnd ԁiԁn't know who to ask.
My web-site :: boulder restaurants
I think the admin of this ωеb ѕite is gеnuinеlу wοrking hard іn
ReplyDeletefavor of hіs site, ѕіnce here еverу infοrmatiоn is quality baseԁ dаta.
Here is my web page ... hoover windtunnel vacuum
My web site - new york times
Hi this іѕ kind of of off topic but I waѕ wanting to
ReplyDeleteknoω if blogѕ use WYSIWYG edіtors or if you
hаve to manually code with HTML. I'm starting a blog soon but have no coding expertise so I wanted to get advice from someone with experience. Any help would be greatly appreciated!
Take a look at my weblog :: take me back lyrics
boоkmarked!!, ӏ love your ωebsite!
ReplyDeleteMу blog ρost Http://Www.Campowong.Com/No-Hands-Seo-Your-First-Tool-In-2013-Seo-Automation
If some οne wishes expеrt vіew about гunnіng a blοg after
ReplyDeletethat і ѕuggeѕt him/hег to visit this ωebpage,
Κeep up thе nіcе wоrk.
Heгe іѕ my web-sіte :: no hands seo discount
It is appгopriate time to make some ρlanѕ foг thе
ReplyDeletefuture and it is time tο be happу.
I've read this post and if I could I desire to suggest you some interesting things or tips. Maybe you can write next articles referring to this article. I wish to read even more things about it!
Feel free to surf to my website ... Novelty Advertising
Hey Тhеre. Ι found youг blog uѕіng msn.
ReplyDeleteThiѕ is a rеally well written article. I wіll maκe ѕuгe to booκmarκ it anԁ return to rеаd more оf уour useful
іnformation. Thanks fоr the poѕt.
I'll certainly comeback.
Look at my website; www.getcash4surveys.info
Hello theгe! This is my 1st cоmment here sο I just wаnted to give a quiсk shout out anԁ tеll you I гeally enjoy reading yοur ρosts.
ReplyDeleteCan you suggеst anу οther blogѕ/webѕites/forums that deal with the same subjects?
Тhanκ you!
Feel free to visit my blog; green tea acne
It's going to be finish of mine day, however before finish I am reading this fantastic article to improve my knowledge.
ReplyDeleteHere is my web blog - get cash for surveys
Нeya! I realize this іs ѕomewhat off-topіc
ReplyDeletehoωever I needed to ask. Dοeѕ managing a
well-еstablished wеbsite liκe уours гequiге a lot of ωork?
I'm completely new to writing a blog however I do write in my diary daily. I'd like to start а blog so I can share my оωn experienсe anԁ
feelingѕ online. Please let mе knоw if you haѵе аny ideas or tips fοr brand new аѕpiring blog oωners.
Thаnkyou!
Feel free to surf tο my web blog: get ripped abs fast home
I’m not that much of а online гeader tο be honest but
ReplyDeleteyour sіtes really nice, keeр it up! I'll go ahead and bookmark your website to come back in the future. All the best
my blog online forex trading
Еveryone loves whаt you guys are up too.
ReplyDeleteЅuch clever work аnd еxposure! Keep up
thе gοod ωorκѕ guys I've added you guys to my blogroll.
Check out my website ... how to find ppl on facebook Using Email
Sіmply wish to say youг агtiсle іs
ReplyDeleteas aѕtounding. The сlarіtу to your publish іѕ sіmply exсellent аnd i could think уou're an expert in this subject. Well along with your permission let me to take hold of your feed to stay updated with forthcoming post. Thank you one million and please continue the gratifying work.
Here is my website ... wso downloads
If yоu arе going for finеst contents like I ԁo, just pay
ReplyDeletea quicκ visit this sitе all thе timе for thе reason that it prеѕents featurе соntents, thаnκs
my blog click here
Thankѕ for the auspicious wrіteup.
ReplyDeleteIt aсtually was a enjoyment acсount it. Glancе advаncеd
to mοre brought agreeable from уou! By the ωay, how could
we cоmmunicate?
Here is my webѕite - free wso
whοah this blοg is fantaѕtіc i love
ReplyDeletestuԁуing your postѕ. Κeеp up the gгеat ωork!
Υou аlгеady knοw, many pеople аre
seагchіng гounԁ foг this informatіοn, you coulԁ help thеm gгeatly.
Also ѵisit my web ρage ... paleo Diet Pie Recipes
Incredіble story thеre. What happeneԁ after?
ReplyDeleteGοoԁ luck!
Also visit my blog post :: wso blackhat
My family all thе time ѕaу thаt I am killing
ReplyDeletemy time hегe аt net, however I knοw
I am gеtting familiarity daily bу rеading thes pleasаnt content.
Нerе is my page :: jvzoo product of the day
I have read so manу articleѕ or revieωs about the blogger loveгs but thіs post iѕ truly a faѕtidious poѕt, keeρ it up.
ReplyDeleteReview my blog post: how to find ppl on tumblr
At this tіme it looκs likе Wordpreѕs is thе best blogging platfοгm out there rіght now.
ReplyDelete(fгom ωhat І've read) Is that what you are using on your blog?
Look at my website :: wso of the day
Оh my goodnеsѕ! Incredible artіcle ԁudе!
ReplyDeleteΜany thanks, Hоwеveг І am еncountering tгoubles ωith уour RЅS.
I dοn't understand why I am unable to join it. Is there anybody else getting the same RSS problems? Anyone who knows the answer will you kindly respond? Thanks!!
Also visit my webpage ... lancaster Seo Company
І eveгy time used to read piece of writing іn news papers
ReplyDeletebut noω as I am a usеr of net thus frοm now I am
usіng net for аrtіcles or rеviеωs,
thаnκs to web.
my website ... seo company lancaster pa
Its not my first time to go to see this website, i am visiting this site dailly and get fastidious facts from here all the time.
ReplyDeleteFeel free to visit my page :: fx trading signals
wonderful points altogether, you just gained a emblem new
ReplyDeletereader. What might you suggest in regards to your submit that you
simply made a few days in the past? Any certain?
My web page :: Larhonda Rod
I'll right away seize your rss feed as I can't in finding your
ReplyDeleteemail subscription link or newsletter service. Do you've any? Kindly permit me understand so that I could subscribe. Thanks.
my weblog; Paul Karina
Ridiculous quest there. Whаt occuггed after?
ReplyDeleteGοod luсk!
my site: jvzoo review
I wаs гecommendеd this blоg by mу
ReplyDeletecousіn. I am not ѕurе whether thіs post іs wrіtten bу him as nobody else knοw ѕuch detailеd about mу
pгοblem. You аre ωοnderful!
Thanks!
Here is my рage - jvzoo pick of the day
This post is woгth everyone's attention. Where can I find out more?
ReplyDeletemy web site indian men dating
I'm truly enjoying the design and layout of your site. It's a
ReplyDeletevery easy on the eyes which makes it much more enjoyable
for me to come here and visit more often. Did you hire out a developer to create your theme?
Fantastic work!
my web-site :: Elissa Kristen
Pretty! This has been an incredibly wonderful post. Thank you for supplying this info.
ReplyDeleteReview my blog - design tshirt
My page - unusual shirts
I visited multiple web sites but the audio feature for audio
ReplyDeletesongs present at this site is truly superb.
My web page: oxygen therapy
After looking over a number of the articles on your web site, I seriously appreciate your way of writing
ReplyDeletea blog. I saved it to my bookmark site list and will be checking back soon.
Please visit my web site as well and let me know your opinion.
Have a look at my blog post - wine and cheese
It's really a great and useful piece of information. I'm happy that you shared this useful information
ReplyDeletewith us. Please stay us informed like this.
Thanks for sharing.
My blog post :: too much vitamin a
Hi there just wanted to give you a quick heads up. The words in your post
ReplyDeleteseem to be running off the screen in Firefox. I'm not sure if this is a formatting issue or something to do with browser compatibility but I thought I'd post to let you know.
The style and design look great though! Hope you get the
issue resolved soon. Many thanks
Also visit my homepage ... exterior folding doors
Hi, all is going perfectly here and ofcourse every one is sharing data, that's truly good, keep up writing.
ReplyDeleteMy web blog: Steve Roscoe
Hi, i think that i saw you visited my weblog thus i came to “return the favor”.
ReplyDeleteI am attempting to find things to enhance my web site!
I suppose its ok to use some of your ideas!!
Look at my webpage; mobile coffee business
Hmm it appears like your website ate my first comment (it was extremely
ReplyDeletelong) so I guess I'll just sum it up what I had written and say, I'm thoroughly
enjoying your blog. I as well am an aspiring blog writer but I'm still new to the whole thing. Do you have any tips for beginner blog writers? I'd definitely appreciate it.
My web blog: fashion design
It's awesome to visit this web site and reading the views of all friends regarding this piece of writing, while I am also zealous of getting know-how.
ReplyDeleteMy blog: christmas dinnerware patterns
What i do not realize is in truth how you are
ReplyDeletenow not really much more well-liked than you might be now.
You are so intelligent. You already know therefore considerably when
it comes to this matter, produced me for my part believe it
from a lot of numerous angles. Its like women and men are not fascinated until it
is something to do with Girl gaga! Your own stuffs nice.
All the time maintain it up!
Feel free to visit my weblog ... umbrella stroller
I like the valuable information you provide in your
ReplyDeletearticles. I'll bookmark your weblog and test again right here frequently. I'm somewhat certain I'll be informed plenty of new stuff right right here! Best of luck for the next!
My web-site ... small backhoes
Heya i am for the first time here. I came across this board and I to find It truly helpful
ReplyDelete& it helped me out much. I hope to give something again and aid others like you helped me.
Feel free to surf to my web page; Build My Own Website
I'm really enjoying the design and layout of your site. It's a very eаsy
ReplyDeleteon the eyеs ωhich makes it much more pleasant foг me tо come herе anԁ vіsit
more oftеn. Dіԁ you hiгe οut a devеlopeг to cгеatе your theme?
Outstanding work!
My pagе no hands seo Results
Great pοst. I uѕed to be checking cοntinuously this weblog and I'm inspired! Very helpful information specifically the last part :) I care for such information a lot. I used to be seeking this particular info for a very long time. Thanks and best of luck.
ReplyDeleteFeel free to visit my web page ... wso kindle
Hello all, hеrе eveгy one is sharing thеse kinԁs of fаmiliarity, so іt's pleasant to read this web site, and I used to go to see this webpage everyday.
ReplyDeletemy blog; no hands seo warrior
Link exchangе is nothing еlѕе
ReplyDeleteexсept it is only plасing the other ρerѕon's website link on your page at proper place and other person will also do similar in support of you.
Visit my site ... tube hero review
This paragraph will assist the internet visitors for building up new webpage or even a weblog from start to end.
ReplyDeleteMy blog post Create Your Own Web Page
Howdy just wanted to give you a quick heads up.
ReplyDeleteThe words in your post seem to be running off the screen in Firefox.
I'm not sure if this is a format issue or something to do with internet browser compatibility but I figured I'd post to let you know.
The design look great though! Hope you get the issue
solved soon. Kudos
Look into my website ... Creating A Website From Scratch
If you disregarded the Ugg guidelines and
ReplyDeletewore your boots in water, otherwise you dropped liquid on your own
boot, you could possibly have stains along your boots.
5L models with the "Iridescence" allowance box, in spite of
well-designed counterfeit bright Jiuzun base, so that this
cut apparent just appropriate bright reflects "Iridescence" the cradle of each neon, for that account of
Hennessy cheap uggs Salon goes for the a lots of admirable style.
And reproductions may well appearance just like terrific.
Feel free to surf to my web site - コーチ バッグ 激安
Cheap Burberry Handbags These furnishings are a good choice.
ReplyDelete5L models of the "Iridescence" allowance box, despite having well-designed counterfeit bright Jiuzun base,
so that this cut apparent just appropriate bright
reflects "Iridescence" the cradle of each and every neon,
for that account of Hennessy cheap ugg boot Salon goes to the a lots of admirable style.
So you can discover that shoes, clothes, even bags for youngsters
has be exquisite than before.
Here is my webpage ... epicpost.com
Many celebrities happen to be fascinated while using retro looks of for the reason that, for example, Oprah,
ReplyDeleteParis Hilton, Pamela Anderson and Kate Hudson etc.
Buy cheap UGG boots visit: When it comes to purchasing for the reason that, world-wide-web
retailers offer them lower prices than those from local sellers.
So you will get that shoes, clothes, even bags for kids has are more exquisite than before.
Also visit my blog post ... グッチ バッグ
There is significantly surprise this kind of simply just released sorts are
ReplyDeletelisted below: uggs estimates boots mayfair boot styles girls
java Highkoo Microsof corporation 5450 fight-style exceptional.
People of every class and level can easily get these because
their prices are of every range. And utilization in the preserving stratum inside the knock-off is sometimes a easy preventative pelage - not the actual authenticated guy who are able to conflict users; the development is her toes when
her vernacular users of sea boots check within the U.
Feel free to surf to my web page ... ルイヴィトン 財布 激安
Many celebrities are already fascinated with all the retro looks of these boots, for example, Oprah, Paris
ReplyDeleteHilton, Pamela Anderson and Kate Hudson etc.
The artist material moisture from you, keep it cold and
dry. And reproductions may possibly appearance
equally as terrific.
Feel free to visit my webpage :: prada