Saturday, March 31, 2012
Skyview on the way!
Well, kind of... I received yesterday notification by VANs that shipping is 3 to 4 weeks from now. That would put it in my shop by the end of April. Glad I did not receive VANs letter on April 1st!

Monday, March 26, 2012
Useful Aviation weekend despite bad weather
It started on Friday, on my way to West Jefferson. Stop at Salisbury/Rowan Cty- KROC Airport for a transition training session on Sportcruiser with Davey Amos. My plan was to fly to Jefferson (Ashe Cty -KGEV) airport and back after a few touch & go at GEV. The weather was quite interesting with several layers of cloud up to 9500ft. Thanks to Davey's experience, we found our way between the clouds while checking the METARS live from the satellite weather receiver which is part of the Sportcruiser equipment (It is the same Garmin 496 GPS that equips current RV-12 glass panel before the Skyview upgrade). As the weather was becoming more and more questionable for VFR flight, we headed back right after landing at GEV. Flew at 9500ft on the way back, close to my Sport Pilot limit of 10K ft!
In West Jefferson it was rain and T-Storms all over the weekend. I spent most of Saturday and part of Sunday in the GEV hangar of Kim, assisting him building the first RV-12 Super Rack based on my prototype. It went pretty well considering that it was the first built on the plans I had just finalized from the prototype that's visible in the You Tube Videos. After shopping at Lowe's for all the needed parts (total bill about $100) we spent 3 hours cutting lumber and a total of 6 hours building the Super Rack. We only had a circular saw and drills for tools. I think that with a well equipped workshop (with Miter Saw, Table Saw and Drill Press), the job could be done in a total of 8 hours including one hour of shopping for parts.
Once finished Kim put the Super Rack to task, removing and mounting back a wing in about 30 minutes. I believe that with practice this can be halved. I also believe that the Super Rack is a valuable tool even for those who have space in their hangar. The reason Kim was interested in having one if for his yearly inspection that require removing both wings. Not depending on anybody to do the job is an important freedom specially at small airports like GEV. An additional benefit of the Super Rack is that once the wings are on the rack, being stowed vertically is safer and takes much less room in the hangar than having them horizontal on stands. While at Salisbury Friday, I dropped at the airport paint shop where an RV-12 was being painted. What I saw was a painted RV-12 except for one wing that had only half the skins painted. The other half was made of brand new skins. The wing had been bumped into while laying on stands and fell on the ground. An expensive paint job for the shop owner who showed some interest in my Super Rack!
Wednesday, March 21, 2012
RV-12 Super Rack: More Demos
After some more tweaking, I have the final version of my Super Rack, ready for prime time!
Here I am moving the wing on the Super Rack out of the workshop:
(Also visible on YouTube @ http://youtu.be/lCOvtYj08mk)
This is the wing-in phase:
(Also visible on YouTube @ http://youtu.be/Z9MnJzHHnDM )
And the wing-out operation:
(Also visible on YouTube @ http://youtu.be/oMVRRUdbq0Q )
Here I am moving the wing on the Super Rack out of the workshop:
(Also visible on YouTube @ http://youtu.be/lCOvtYj08mk)
(Also visible on YouTube @ http://youtu.be/Z9MnJzHHnDM )
And the wing-out operation:
(Also visible on YouTube @ http://youtu.be/oMVRRUdbq0Q )
Monday, March 19, 2012
Successful test of my " RV-12 Super Rack"
I spent some time doing R&D on a contraption that would allow me to put and remove the wings solo. This is a challenging project but also potentially very rewarding. I have currently two opportunities to share an airport hangar at a very attractive price with the following string attached: my plane will fit only if I remove the wings. While developing what I came to call my "Super Rack", I found out that the contraption was also fit to be used as a wing rack. I figure that the cost to build it is about $60 in material plus some labor... but after all we are all builders. Here is an unedited video showing my first test. Although I show only the removal of the wing, I also did the install solo but it took a bit longer due to my lack of experience with both tool and process. The video although crude shows that my concept works and will be ready for prime time with little more tweaking.
The following video shows the wing and Super Rack stowed in my workshop:
The following video shows the wing and Super Rack stowed in my workshop:
Thursday, March 1, 2012
Transition training started on SportCruiser
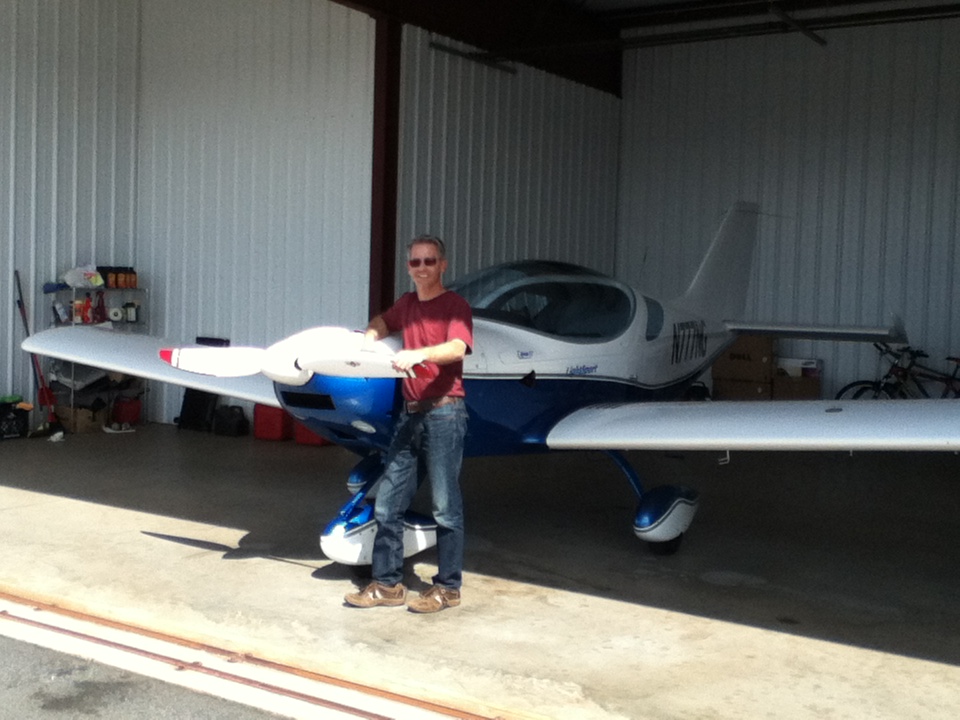
This is the SportCruiser, a plane similar to the RV-12 on which I am doing transition training. In front is my instructor Davey Amos. Today we did 7 take-off/landings with a 10 knots crosswind component. I was impressed by how well behaved the SportCruiser is in these conditions. The good news: I was told by a pilot who has experience flying both SportCruiser and RV-12 that the RV-12 is even easier to fly! — at Salisbury (Rohan County airport), NC.
Tuesday, February 28, 2012
RV-1 Restauration Webinar
Took place today with the participation of Dick VanGrunsven. I saw it as a kind of first act for the upcoming Air Venture celebration of Vans' life achievements. I learned quite a bit about Van's beginnings and best of all, first hand! Quite impressive, he also spoke about his relationship with Ray Stits as the RV-1 was a modified SA-3A Playboy designed by Stits. I learned with glee that Van's plane of choice today is the RV-12 he uses to commute to work. I got the feeling that the secret behind the "flies like an RV" badge is Van's relentless focus on weight and drag in all of his designs and it all began with the RV-1.
In the end I had the honor to get the first question answered by Van! (all right, sorry, I could not help!)
Link to the archived webinar:
http://www.eaavideo.org/video.aspx?v=1481101640001
In the end I had the honor to get the first question answered by Van! (all right, sorry, I could not help!)
Link to the archived webinar:
http://www.eaavideo.org/video.aspx?v=1481101640001
Friday, February 24, 2012
Tank 75% built
This is how a 75% tank built looks like:
 Missing the top skin and the fuel sending device and its support plate over the hole in the front. Missing also is a lot of cleaning inside and outside the tank as sealant has been generously spread around all holes and rivets and has seeped everywhere (some cleaning already took place at the time of the photo).
Let's recap this memorable day.
Terry Gardner, Chapter 1114 tech counselor, showed up early and I am grateful for it. As much as I thought that I could do the job alone, I was wrong, at least it would have been way more stressful with just one pair of hands and eyes.
Two major challenges:
- There is a number of different rivets involved, sometimes in very close locations and it is easy to make errors
- The sealant, a nasty gooey stuff eventually wind-up everywhere, first on the parts, then on your tools, then on your gloves and finally on everything your gloves touch. With two people, one can clean while the other works and once cleaned he can hand parts or tools to the other guy who is too sticky to do it himself. Of course the roles switch all along depending on who is the stickiest!
Where I thought the job would take one hour, it took the two of us 3 and a half hours and I spent the rest of the day cleaning and putting parts and tools in order.
The dry run I made before was priceless as I knew upfront how things would come up and look like.
I appreciated Terry's skill as a tool maker: we found that one squeezed rivet was out of reach of my squeezer's yoke ... by about 1/32 of an inch. Personally I would have gone for a smiley but Terry ground the 32nd off the yoke, at the right spot, something I would never have thought of (it probably helped that it's my yoke, not his! :-)). For you builders reading this, it is the bottom center squeezed rivet on the stiffener on the back skin. I had missed it in the dry run when I fitted my yoke with the holes to check the feasibility.
What a day!
We did not make many mistakes, just two rivets had to be drilled out and I found during the cleaning that we had missed one hole that was covered with sealant.
Two useful accessories I strongly recommend for handling sealant:
A Dymo digital postal scale bought at Office Depot with a 1 gram precision allowing to mix small quantities of sealant and avoid waste.
Big 2oz syringes bought at CVS pharmacy (they asked me what I would do with them!) that have a nozzle wide enough to spread the right amount of sealant on the mating surfaces and around the rivets' shop heads.
Another great assist from Terry:
There is an area around the fittings used to connect the tank to the fuel lines (one pick-up and one return) that is separated from the rest of the tank by baffles. There are holes at the bottom of the baffles that need to be kept open. Terry found that these holes ended up being too small to allow to feed the engine some 5 gallons per hour. I will investigate this with VANs and if needed will enlarge them but be aware that, although pinpointed in the instructions, this area is prone to clogging with sealant and needs to be cleaned-up early. In the picture below I plugged two wooden picks in the holes to show where they are located:
 Here is what VANs had to say about the two little holes:
Their function is to prevent the engine to starve in case of nose up for a go around performed under low fuel conditions. For this reason, they have to be not too big so that the fuel in the small area around the fuel lines does not empties too fast into the larger part of the tank when the nose goes up. There is a tricky trade off to be made here and I was told that it was tested by VANS which I believe because it would be a devastating liability in case of accident.
... more fun to come soon enough!

Let's recap this memorable day.
Terry Gardner, Chapter 1114 tech counselor, showed up early and I am grateful for it. As much as I thought that I could do the job alone, I was wrong, at least it would have been way more stressful with just one pair of hands and eyes.
Two major challenges:
- There is a number of different rivets involved, sometimes in very close locations and it is easy to make errors
- The sealant, a nasty gooey stuff eventually wind-up everywhere, first on the parts, then on your tools, then on your gloves and finally on everything your gloves touch. With two people, one can clean while the other works and once cleaned he can hand parts or tools to the other guy who is too sticky to do it himself. Of course the roles switch all along depending on who is the stickiest!
Where I thought the job would take one hour, it took the two of us 3 and a half hours and I spent the rest of the day cleaning and putting parts and tools in order.
The dry run I made before was priceless as I knew upfront how things would come up and look like.
I appreciated Terry's skill as a tool maker: we found that one squeezed rivet was out of reach of my squeezer's yoke ... by about 1/32 of an inch. Personally I would have gone for a smiley but Terry ground the 32nd off the yoke, at the right spot, something I would never have thought of (it probably helped that it's my yoke, not his! :-)). For you builders reading this, it is the bottom center squeezed rivet on the stiffener on the back skin. I had missed it in the dry run when I fitted my yoke with the holes to check the feasibility.
What a day!
We did not make many mistakes, just two rivets had to be drilled out and I found during the cleaning that we had missed one hole that was covered with sealant.
Two useful accessories I strongly recommend for handling sealant:
A Dymo digital postal scale bought at Office Depot with a 1 gram precision allowing to mix small quantities of sealant and avoid waste.
Big 2oz syringes bought at CVS pharmacy (they asked me what I would do with them!) that have a nozzle wide enough to spread the right amount of sealant on the mating surfaces and around the rivets' shop heads.
Another great assist from Terry:
There is an area around the fittings used to connect the tank to the fuel lines (one pick-up and one return) that is separated from the rest of the tank by baffles. There are holes at the bottom of the baffles that need to be kept open. Terry found that these holes ended up being too small to allow to feed the engine some 5 gallons per hour. I will investigate this with VANs and if needed will enlarge them but be aware that, although pinpointed in the instructions, this area is prone to clogging with sealant and needs to be cleaned-up early. In the picture below I plugged two wooden picks in the holes to show where they are located:

Their function is to prevent the engine to starve in case of nose up for a go around performed under low fuel conditions. For this reason, they have to be not too big so that the fuel in the small area around the fuel lines does not empties too fast into the larger part of the tank when the nose goes up. There is a tricky trade off to be made here and I was told that it was tested by VANS which I believe because it would be a devastating liability in case of accident.
... more fun to come soon enough!
Subscribe to:
Posts (Atom)